Showing posts with label birthday. Show all posts

Monday, 1 September 2025

Birthday card with bird on a wooden bucket

My mom's birthday isn't until October but I've already made her card because I don't know when I'll have time to create something due to teaching.


My parents live in a house with a garden, and they always put out food and water for the birds. They like watching them.  So, this card is about a bird landing in their garden to drink water. 


If you like it, here comes the tutorial.


First the bucket. 


For this, I used the Sizzix Bigz, Potted (664184) die. I cut out twice the pot and the parts of the hoop.


Then I drew four lines vertically on the bucket. Then I cut it into pieces along the lines.


I placed the five pieces to the Sizzix Lumber, 3D embossing folder (662718). I ran the embossing folder through the Sizzix machine.


Then I coloured the embossed papers with brown inks (Gathered Twigs and Pumice Stones). I coloured the bucket which remained in one. And then I started to glue the pieces to the bucket. 


Then I painted silver the hoops with Brushed Pewter Distress paint. When the hoops were dry I inked the edges with Black Soot Archival ink.


I put two fasteners (Idea-Ology Mini Fasteners) to the holes and I attached the hoops to the buckets with strong glue. 


Now the bird.

For the bird, I used the Feathered Friends, Sizzix Thinlits die (664433). I cut out the bird from 300gsm watercolour paper and I coloured with the following Distress inks (normal and oxide): Stormy Sky Oxide, Faded Jeans Oxide, Faded Jeans, Prize Ribbon, Ground Espresso, Vintage Photo.


And the background. 

I stamped the Flourish background stamp (Stampers Anonymous, Lattice&Flourish CMS257) to a piece of watercolour paper with embossing ink. And heat embossed with Ranger Silver Pearl embossing powder. 


I placed a piece of real twig to the bottom of the card and I glued a thin strip of moss on top of it. 


I also placed a few tiny hearts to the card. For this, I used a paper that I coloured previously, so I don't remember what kind of inks I used. But I cut out the hearts with Falling Hearts Thinlits die (664415).


The text was stamped with an MFT stamp (Bitty Birthday Wishes). 


With my card, I would like to join the Simon Says Stamp Monday Challenge: Stamp it.


Tuesday, 15 July 2025

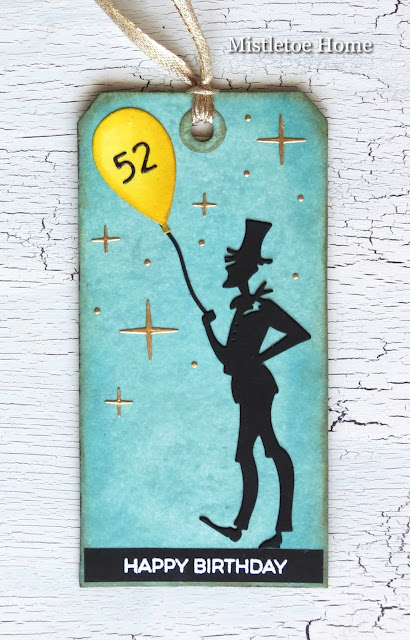
Masculine birthday tag with a gentleman silhouette

Hello everyone, I'm here with a masculine birthday tag that I created for my husband who just turned 52. For this, I used the gentleman of the Sizzix, The Park die set by Tim Holtz (665204).


I cut out a tag shape with Sizzix Bigz die, Tag&Bookplates (656938) from white paper, then I blended Speckled Eggs and Tumbled Glass Distress inks to the surface. I added Frayed Burlap to the edges.


I cut out the gentlemen twice from black paper then I glued them together. 

For the balloon, I used white paper and the Sizzix Celebrate Colorize die set by Tim Holtz (666285). I coloured with Squeezed Lemonade and Mustard Seed Distress inks.

The numbers were cut out with the Sizzix Alphanumeric Label die (664177) from black paper.


For the stars, I used again the Celebrate Colorize set and gold metallic paper from the Idea-Ology Kraft Paper 8x8" paper pad.

I used the same paper for the dots, but the Sizzix Sidekick Side-Order die, Birthday by Tim Holtz (662703).

The text is part of the My Favorite Things, Essential Sentiments stamp set. I heat embossed with Ranger fine white embossing powder on back paper.

The final touch was adding a gold ribbon to the hole.


Thursday, 10 April 2025

Birthday card for a 16-year-old girl

Hello everyone, I'm here again with a birthday card that I made for a 16 years old girl. The main character of this card is called Whimsy Girl and I bought the stamp a long time ago. 


I stamped the girl on Neenah Solar White paper with Tsukineko Memento ink (Espresso Truffle) and coloured with Copic Sketch markers. I stamped dots on her dress because there are no dots on the original version.


In the end, I coloured the image with Faber Castell Polychromos pencils. The dots were coloured with silver paint.


The background was made with a Stampers Anonymous Stamp set, Dots and Floral (CMS220) by Tim Holtz. I stamped the dots with embossing ink and heat embossed with white embossing powder. Then I smeared Picked Raspberry ink to the surface. I inked the edges with Pumice Stone ink. 


For the balloon, I used the Stampers Anonymous Crazy Things stamp set (CMS237). I stamped and coloured the same way as the little girl. The only thing worth mentioning here is that I stamped numbers into the balloon. For this, I used a Lawn Fawn stamp set, Milo's ABC.

For the text, I used Tiny Text (CMS394) and stamped on the same paper I used under the dotted background. Again I used white embossing powder.


Wednesday, 7 August 2024

Birthday card with tea cups and bunny

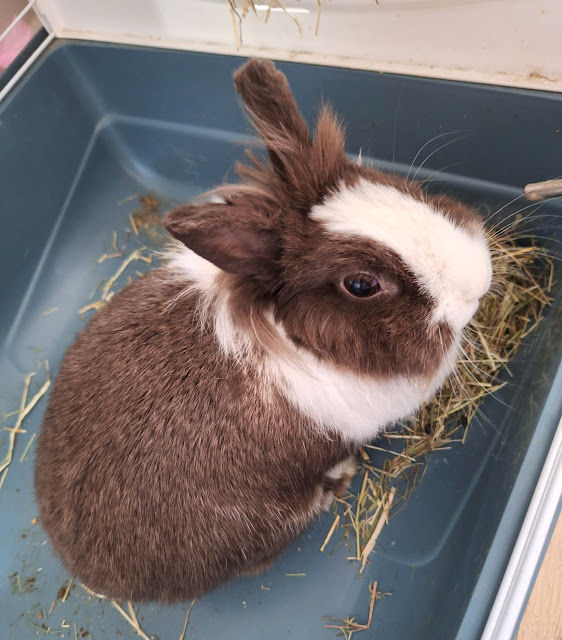
Hello everyone, I'm here again with a new birthday card that I made for my friend who loves tea and who always had a bunny since I've known her. 


But the story doesn't end here. Unfortunately, on his birthday, I forgot to call and say happy birthday to her. I had never done that before, and luckily I had a good excuse for doing that.

For her birthday I also bought a lot of teas and tea blends. 

And the bunny looked so ill lately that one of the vets advised to euthanise the bunny. But luckily they asked another vet who didn't see this necessary at all. So the bunny is still alive and seems really happy.


Now, about the card making. 

For the background, I used a cream white paper and embossed it with the Lace embossing folder by Tim Holtz. 

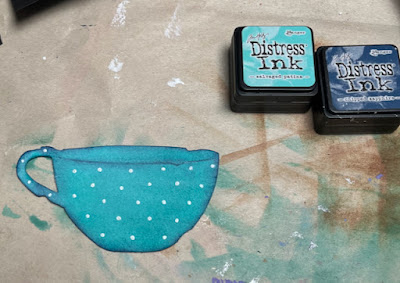
The cups were coloured with Distress inks, then I muted the colours with wet white paint. And when it was dry, I added white dots with a very fine brush and acrylic paint.


What I used:

Sizzix Texture Fades, Lace embossing folder (661824)

Sizzix Bigz die, Teatime (660234)

Sizzix Thinlits die, Carrot Bunny (665213)

Sizzix Thinlits die, Falling Hearts  (664415)

My Favorite Things, Bitty Birthday Wishes stamp set

Ranger Distress inks 

Ranger embossing powder (super fine white)

etc.


With my card, I would like to join the Simon Says Stamp Monday Challenge: Happy Birthday


Friday, 7 June 2024

Birthday card with Clarence the elephant

Hello everyone, I'm here with a birthday card that I made for my daughter's best friend, Moesha whose favourite god is Ganesha the elephant-headed god. This is why I chose Clarence, and put him to the focal point of my card.


The background was made with different purple Distress inks, because Moesha's favourite colour is the purple. I splattered the background with gold paint. 

Clarence's pieces were cut out from white paper and I painted them with different shades of grey. For painting them I used Distress paints and for achieving some middle tones I mixed the greys.

The suitcase was coloured with Distress inks.


What I used:

Sizzix Thinlits die, Clarence Colorize (664428)

Sizzix Bigz die, Baggage Claim (664439)

Sizzix Thinlits die, Celebrate Colorize (666285)

Sizzix Thinlits die, Alphanumeric Label (664177)

Sizzix Bigz die, Crescent Moon&Stars (658716)


Tuesday, 7 May 2024

Birthday card with The Count by Tim Holtz

Let me show you my birthday card that I made for a friend. That's the first time that I use The Count not only on a Halloween card but for a completely different occasion. Actually, the inspiration to use the count for other things came mainly from Emma Williams, but you can also find ideas from other crafters on Instagram and Pinterest where the count is on the beach or in the mountains for example.


For the background, I took a 300 gsm watercolour paper and I started to blend Cracked Pistachio and Pine Needle to the surface. The Cracked Pistachio to the middle and the Pine Needle to the edges mainly.


Then I added a little Ground Espresso and Black Soot to the very edges. I protected my inked surface tapping matt varnish with a sponge.


The suitcase was painted with Prize Ribbon paint.


The decorative elements of the suitcase and the handle were cut from kraft paper. For the darker parts, I just added brown Distress ink. 


And here is the tutorial for the count with step by step pictures.

I cut out the count from 300 gsm watercolour paper and coloured the head part first with Antique Linen, then with Brushed Corduroy ink.


Then all the other layers of the head were coloured with the same inks but my goal was to get lighter and lighter layers. So the top layer was just coloured with Antique Linen.


Under the head, I coloured The Count's body with Black Soot ink. But I also cut out the whole Count from black paper. I cut off the head part and I glued to the main layer.


Then I started to assemble The Count.


The Count's hat and lorgnette were cut out with the dies of The Gent Thinlits set. I got the umbrella from The Park set and the bow tie from Tailored die set.


What I used:

Sizzix Thinlits die, The Count (665557)

Sizzix Thinlits die, Tailored (666289)

Sizzix Thinlits die, The Park (665204)

Sizzix Thinlits die, The Gent (665202)

Sizzix Bigz die, Baggage Claim (664439)

My Favorite Things, Bitty Birthday Wishes

Ranger Distress inks (Cracked Pistachio, Pine Needle, Ground Espresso, Brushed Corduroy, Antique Linen, Black Soot)

Ranger Distress paint (Prize Ribbon)

etc.


Tuesday, 27 February 2024

Harrison the lion king

Hello everyone, I'm here with a card that I created for one of my nephews, Mátyás. I made it for his name-day. Hungary had a great king, Matthias Corvinus, or Mathias Rex in latin, and I played with this name to make my nephew happy.


And here is the tutorial.

I cut out the pieces of Harrison from different shades of brown. For this, I used textured paper. Then I assembled him. 

I took a rectangle paper and I put Harrison on it. I wanted a slimline card, so I cut off the unwanted parts from my panel. Then I blended red Distress inks to the surface. The background of the card was mostly coloured with Festive Berries ink. Then I added Aged Mahogany to the edges and Ground Espresso to the very edges. Then I spritzed with water.

The background of the nameplate was made with Broken China ink. The letters were cut out with Alphanumeric Label dies from black paper.

I used the same gold paint for the crown, the bigger layer of the nameplate and the stars.


What I used:

Sizzix Thinlits die, Harrison Colorize (665218)

Sizzix Thinlits die, Alphanumeric Label (664177)

Sizzix Bigz die, Crescent Moon&Stars (658716)

Sizzix Movers&Shapers die, Mini Crown&Fleur (657210)

Ranger Distress inks (Broken China, Festive Berries, Aged Mahogany, Ground Espresso)

etc.


In the very end, when I glued all the elements in place, I smeared Micro Glaze to the surface of the red panel. This is not just good for protection but also deepened the background colour.


With my card, I would like to join the Simon Says Stamp Monday Challenge: Fur or Feathers


Tuesday, 16 January 2024

Birthday card with Mary Poppins

This is a birthday card for the most important female in my life, my daughter who turned 18 today. I am incredibly happy that almost 19 years ago, on a holiday in Rhodes, we were chosen by this wonderful soul. Well, without further ado, here is the card that I made her.


I chose the lady from The Park die set, because she loves Marry Poppins. For the lady I wanted to make a festive background so I chose the Retro Flakes stamp set, because they snowflakes look like firework sparks. And the Mary Poppins text is just so perfect for this occasion.

And here is the tutorial.

I took a blue cardstock and started to stamp the snowflakes with embossing ink. I used silver and gold embossing powders for the heat embossing.


When my panel was filled with silver and gold snowflakes, then I spattered the paper with silver and gold acrylic paints. When it was dry, I inked the edges of the panel with Mermaid Lagoon Distress ink.


I made a golden frame for the text and for the blue panel too. For this, I used the same gold embossing powder that I used for the gold flakes.


I also put transparent rhinestones to the middle of the silver sparks. 

I cut out the numbers and the lady twice from black cardstock. Then I glued the together. I also put a layer of matt black paint to the surface of the die-cuts. 


What I used:

Sizzix Thinlits die, The Park (665204)

Stampers Anonymous, Retro Flakes (CMS417)

MFT Die-Namics, Pumped-Up Numbers

Ranger embossing powder (Silver, Princess Gold)

rhinestones

acrylic paints (black, silver, gold)

etc.


With my card, I would like to join the Simon Says Stamp Monday Challenge: Sparkle and Shine