Showing posts with label roses. Show all posts

Wednesday, 15 June 2022

Thank you card with Perspective butterfly by Tim Holtz

A few days ago one of my friends bought a bunch of thank you card from me. Here I would like to thank you again, my friend! 

And now that the number of my thank you cards decreased, I decided to make new ones.

Here is the first one with one of my favourite backgrounds.


I heat embossed the background with Ranger Princess Gold embossing powder. Then I smeared the watercolour paper with diluted Antique Linen Distress ink.


I inked the edges with Ranger Brushed Corduroy Distress ink.

I stamped the butterfly onto a watercolour paper and heat embossed with the same gold embossing powder. I coloured the inner parts with Candied Apple using a re-inker and a brush. I fussy cut the image.


What I used:

Stampers Anonymous, Perspective (CMS213)

Stampers Anonymous, Vines&Roses (CMS298)

My Favorite Things, Bitty Thanks&Gratitude

Ranger Distress Inks (Antique Linen, Brushed Corduroy, Candied Apple)

Ranger embossing powder (Princess Gold)

Ranger Distress Archival ink (Ground Espresso)


With this card, I would like to join the Simon Says Stamp Monday Challenge: Frame it


Wednesday, 10 November 2021

Thank you card with Detailed Butterfly by Tim Holtz

A thank you card is always good to have at home. So I made one just in case I need it.


Here you can see the background. For making it, I used the Vines&Roses stamp set by Tim Holtz and heat embossed the image with Ranger Sky Blue embossing powder. Then I inked the edges of the stamped panel with Vintage Photo and Walnut Stain Distress inks. Then I spattered with Vintage Photo Spray Stain.


Then I cut out a little bit bigger rectangle panel and heat embossed the edges with Ranger Princess Gold embossing powder. I placed the background with roses on this panel.

The letters were cut out with Sizzix Alphanumeric Classic Upper dies by Tim Holtz and heat embossed with Princess Gold embossing powder. I used the same embossing powder for the butterfly. 

The second piece of the butterfly was coloured with Blueprint Sketch marker then I spritzed with water. When it was dry, I blended Broken China ink to the surface.

What I used:

Sizzix Thinlits die, Alphanumeric Classic Upper by Tim Holtz (664223)

Sizzix Thinlits die, Detailed Butterflies by Tim Holtz (661802)

Stampers Anonymous, Vines&Roses by Tim Holtz (CMS298)

Ranger embossing powders (Sky Blue, Princess Gold)

Ranger Distress inks (Broken China, Vintage Photo, Walnut Stain)

Ranger Distress embossing ink and marker

Ranger Distress marker (Blueprint Sketch)

Ranger Distress Spray Stain (Vintage Photo)

etc.


With my card I would like to join the :

Simon Says Stamp Monday Challenge: Thanks/Thanksgiving

The Funkie Junkie Boutique Blog: Living Things


Thank you for stopping by!!! Happy crafting!!!


Wednesday, 3 March 2021

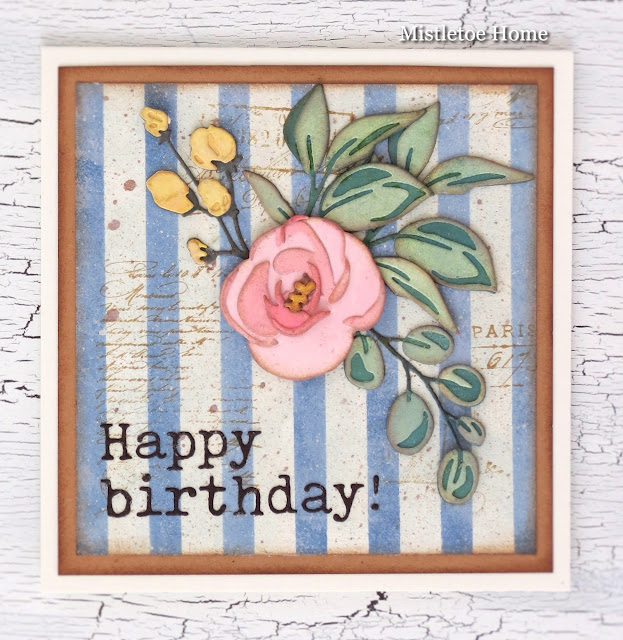
Birthday card with Bloom Colorize

Hello everyone, I'm here again with a birthday card. For this card, I used one of the Sizzix Chapter 1 (2021) Tim Holtz dies, the beautiful Colorize Bloom.


For the background, I had two inspirations. One is from Kath Stewart who created a grey striped background with the Shifter Stripes layering stencil for her card. The other is my Harrison card where I made a blue striped background but with washi tape. 

Here I used the Shifter Stripes stencil and Faded Jeans Oxide ink to make the background for my flower.


The next step was to spatter with diluted Vintage Photo ink, then to tone back the colours with diluted white paint.


I cut off the excess and with Vintage Photo Archival ink, I stamped on the surface here and there. I also inked the edges with Gathered Twigs Distress ink.


I placed my background to a brown cardstock and I inked the edges with Gathered Twigs.


What I used:

Sizzix Thinlits die, Colorize Bloom by Tim Holtz

Sizzix Thinlits die, Tiny Type Lower by Tim Holtz

Sizzix Thinlits die, Tiny Type Upper by Tim Holtz

Stampers Anonymous, Shabby French by Tim Holtz (CMS087)

Stampers Anonymous, Lady Rose by Tim Holtz (CMS255)

Stampers Anonymous, Shifter Stripes layering stencil

Ranger Distress Oxide ink pads (Rustic Wilderness, Bundled Sage, Squeezed Lemonade, Scattered Straw, Mustard Seed, Spun Sugar, Worn Lipstick, Faded Jeans)

Ranger Distress ink (Gathered Twigs)

Ranger Distress Archival ink (Vintage Photo)

Ranger Distress Spray Stain (Vintage Photo)


For assembling my flower and leaves, I followed the instructions of this YouTube video.


I hope you like it!!! Thank you for stopping by!!!


Friday, 1 May 2020

Tea time - tag with tea cups

Hello crafty friends, I'm here to show you my first inspirational project for our May challenge over at Country View Challenges blog. Our theme is Tea Party, Birthday Party and the lovely Miriam will be your hostess.


And here is my tutorial.

I cut out a tag from chipboard with the Tag&Bookplates Sizzix die by Tim Holtz.

Then I added a layer of gesso on both sides.

When it was dry, I painted with PaperArtsy Cheesecake paint.


When the paint was dry, I stencilled the pattern of the Stampers Anonymous Flames stencil by Tim Holtz. For this, I used the Ranger Opaque Matte Texture Paste.

The cups were cut out from 300gsm watercolour paper with the Sizzix Tea Time Bigz die by Tim Holtz.

I stamped and heat embossed flowers to the middle of the cups. For this, I used the Stampers Anonymous Spring Shadows stamp set and two Ranger embossing powders (Sky Blue, Sage).

I inked the edges with Pumice Stone and Antique Linen Distress inks.

I cut out the word TEA with a retired Sizzix Strip die, the Boardwalk.

I used the Botanical Remnant Rubs to write the time on the paper of the teabag. For this, I used the "timeless" word of this set and of course, I cut off the "less".

The rose was - I think - part of the Tim Holtz Idea-Ology Ephemera layers, Botanical set.


If you have a project related to our May theme, please don't hesitate to join us where you can win a £20 voucher.

With this tag, I would like to join the Simon Says Stamp Monday Challenge: Not a card


Tuesday, 10 March 2020

Bookmark with roses

Hello crafty friends, I have made a bookmark using the colours of the MFT current colour challenges, Color Challenge 136 (kraft, peach, green).


What I used:

MFT, Rose Garden stamp set

MFT, Bitty Thanks&Gratitude stamp set

MFT Die-Namics, Stitched Traditional Tags

Copic Sketch markers

Faber-Castell Polychromos pencils

MFT, Kraft Hybrid ink


With my bookmark, I would like to also join the Simon Says Stamp Wednesday Challenge: Something Feminine


Sunday, 1 December 2019

Vintage Hungarian Christmas cards #72

As you know each day in December, I share with you one vintage Christmas postcard from my collection. Since it's December 1, I start showing the vintage Hungarian postcards. 

My first one this year a beautiful card from 1903. It means that it has an undivided back, this is why the sender had to write on the front side.


The theme of this postcard is not really Christmassy, it's more romantic with the roses, the little cupid and the lovely couple. But the text says Merry Christmas - Kellemes karácsonyi ünnepeket!

You can find my other vintage Christmas postcards if you click on the "old Christmas cards" label on the sidebar.


Sunday, 31 March 2019

Fresh-Cut Flowers by My Favorite Things

Here is the 4th version of the Fresh-Cut Flowers by me. In my earlier blogposts, you can find them. This one is made for the current Color Challenge of MFT, the 114th


This time I chose the watercolour technique and the Distress markers, Picked Raspberry, Spun Sugar, Mowed Lawn, Squeezed Lemonade, Twisted Citron. After colouring, I adhered diluted Antique Linen ink to the flowers using a brush. And I also spattered the card with diluted Antique Linen ink. I inked the edges with the same ink using a sponge.


The text is from the Essential Sentiments and heat embossed with Liquid Platinum.

With my card, I would like to join the Simon Says Stamp Wednesday Challenge: Anything goes.

I hope you like it!!! Thank you for stopping by!!!


Thursday, 6 December 2018

Birthday card with cupcake

When I was making this card I was thinking of the colours of the pastry shops, especially the Ladurée. I'm not a huge fan of the pastires of the Ladurée - actually, I'm not a huge fan of things made with sugar - but I love the style, the decorations, the advertisements and the wrappings of Ladurée. 

So I created this:


The first layer of this card was a pastel green cardstock which was embossed using the Polkadot layering stencil by Tim Holtz (THS068) and the Ranger white embossing powder. The edges of the green rectangle was inked with a brown distress ink (Gathered Twigs).


The frame was cut out from chipboard and I painted gold.

The roses were in my stash, I made them earlier.

The cake was stamped on a watercolour paper and was coloured with Ranger Distress markers.

As for the background in the frame ... for this, I used the Reflections stamp and the Ranger Archival Potting Soil ink pad. After stamping I toned back with white acrylic paint, then spritzed with Ranger Distress Spray Stain (Vintage Photo) using a brush. In the end, I inked the edge with Vintage Photo ink.


What I used:

Stampers Anonymous, Birthday Blueprints by Tim Holtz (CMS153)

Stampers Anonymous, Reflections by Tim Holtz (CMS111)

Stampers Anonymous, Hashtags by Tim Holtz (CMS183)

Sizzix Bigz die, Ornate Frame by Tim Holtz (658720)

Sizzix Bigz die, Tattered Florals by Tim Holtz (656640)

Sizzix Thinlits die, Small Tattered Florals by Tim Holtz (661806)

Sizzix Thinlits die, Garden Greens by Tim Holtz

Stampers Anonymous layering stencil, Polkadot by Tim Holtz

Ranger embossing powder (white)

Ranger Distress markers

Ranger Distress ink pads (Gathered Twigs, Vintage Photo)

Ranger Distress Spray Stain (Vintage Photo)

Ranger Archival ink (Potting Soil)

etc.


With my card, I would like to join the Simon Says Stamp Monday Challenge: 'B' is for? - birthday


I hope you like it!!! Thank you for visiting my blog!!!


Friday, 19 October 2018

Floral card with SSS Beautiful Flowers set

Here is my latest card for my sister who celebrated her nameday lately.


For this card, I used the Simon Says Stamp Beautiful Flowers stamp set.

I stamped the image on a 300gsm watercolour paper (Canson) with Ranger Archival Coffee ink.

First I coloured with Spun Sugar and Bundled Sage Distress inks, then for enhancing the colours I added a little Picked Raspberry and Twisted Citron.

The text is from the My Favorite Things, More Essential Sentiments stamp set and was stamped with Ranger Archival Coffee ink.

I inked the edges with Ranger Distress Antique Linen ink and added some sequins for more interest.


I hope you like!!! Thanks for stopping by!!!


Saturday, 15 September 2018

White thank you card with rolled roses by MFT

Just white and just die-cuts... This is my card for the MFT Card Design Superstar contest in the CAS (Clean and Simple) category.


Supply list:

Die-Namics, Grand Greenery

Die-Namics, Mini Rolled Roses

Die-Namics, Swiss Dots

Die-Namics, Twice The Thanks

Die-Namics, A2 Rectangle, Stax1

pearls

Neenah Solar White paper, 110lb


I hope you like it!!! Thanks for stopping by!!!


Friday, 14 September 2018

Thank you card with rolled roses by MFT

Hello everyone, here I am with a thank you card that I made for the My Favorite Things Card Design Superstar contest. I would like to enter this one for the Innovation Master Category because I used 3D roses and because I made a special vintage look with wooden planks :-)


This card is a remastered version of my earlier vintage card with MFT roses and leaves. There I wrote a long tutorial so here I just want to mention the differences.

As you can see in the picture below, I chose two other DecoArt Americana colours to make the background.


After the stamping, I cut my background paper into 3 pieces and made another background paper.


Then I trim off about 1 millimetre from the tops and the sides of my wood planks.

After I inked the edges of the wood planks and smeared some Brushed Corduroy ink onto the surface of the rectangle panel, then spritzed with water.


I adhered the planks to the rectangle panel.

From kraft paper, I cut out the "Thank You" text.

The roses are leftovers and here I told you how I made them.


For the leaves, I chose the following Ranger Distress inks: Evergreen Bough, Twisted Citron, Mowed Lawn.


Supply list:


Die-Namics, Mini rolled roses

Die-Namics, Grand Greenery

Die-Namics, A2 Rectangle dies (Stax1, Stax2)

Die-Namics, Twice the thanks 

Ranger Distress ink pads

Ranger Archival ink, Coffee

DecoArt Americana paints

kraft paper

watercolour paper


Sunday, 2 September 2018

Thank you card with rolled roses

This is not my first vintage "thank you" card with roses but definitely the first one with My Favorite Things stamps and dies.


If you like it, please stay with me and read my tutorial but be aware, it will be a long story! 

For making this card, I cut out a rectangle base from a thick 140lb/300gsm paper with the Die-Namics A2 rectangle die - I'm not sure I used the Stax1 or Stax2 in the end :-)

I put a layer of DecoArt Americana Winter Blue paint.


When it was totally dry I stamped the woodgrain pattern with the MFT Wood Plank background stamp. For this, I used the Coffee colour, Ranger Archival ink.


Since I found the woodgrain pattern too harsh I smeared diluted Winter Blue paint on the surface. Like this, it was much better.


I inked the edges with the same Coffee ink.


I cut out the roses from white cardstock (200 gsm) with Mini Rolled Roses and coloured both sides with Tombow marker (772).


With a wet brush, I dispersed the colour.


When my cut-outs were dry, I rolled them up and added hot glue to fix them.


A little I bent the upper side of the petals and inked the edges with Ranger Distress Brushed Corduroy ink.

I cut out the greens with Die-Namics, Grand Greenery and I coloured them with the same watercolour technique. For this, I used Tombow and Ranger Distress markers (Mowed Lawn, Twisted Citron). In the end, I inked the edges of the leaves with Brushed Corduroy.


Then I stamped the "Thank you" sentiment from Brushstroke Expressions stamp set with Ranger Archival Potting Soil ink. After the first stamping, I used my heat tool to dry the stamping, then I repeated this process two more times because I wanted my text pop out from the background.


I adhered my rectangle woodgrain base to a kraft card and one by one I glued the leaves and the flowers.


With my card, I would like to join the Simon Says Stamp Wednesday Challenge: Anything goes.


Thank you for stopping by!!! Happy crafting!!!