Showing posts with label paper ornament. Show all posts

Friday, 22 December 2023

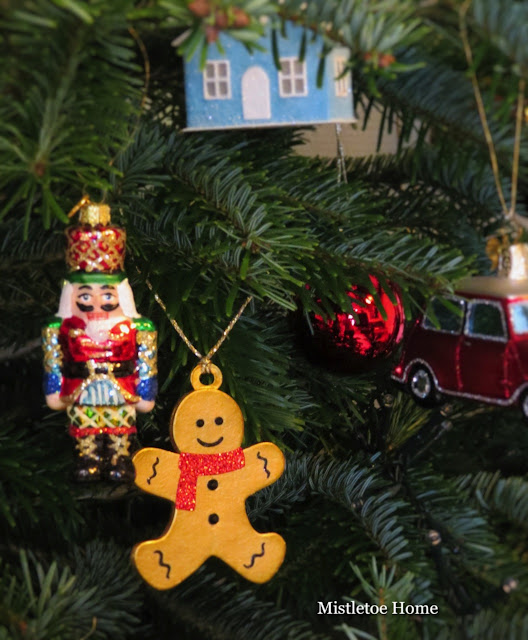
Gingerbread man Christmas tree ornament

Hello everyone, I'm here again with another Christmas tree ornament, a gingerbread man. For this, I used an old and retired die set, the Fresh Baked 2 (663116). 


And if you like it, here is the tutorial for you.


I cut the gingerbread man figure 8 times from a thicker cardboard. It was as thick as the paper of a roll of a paper towel. I glued them together one after the other. In the middle I also placed and glued a little cap that I cut out using another old and retired die, the Carved Ornaments 2 (657475).


Then I painted white both sides.


Then I painted gold with Emperor's Gold DecoArt Americana paint. Actually, I applied at least 3 layers.


Then I added a thin layer of Schmincke gold paint too, because it was less orangey.

Then I added flat back pearls for the eyes and the buttons. The rest of the decorations were cut out from glitter papers (black, red). The scarf is part of the Cool Yule die set (663099). Now this is one is not discontinued yet! 


And see how much fun Gingerbread man is having on the Christmas tree, under the little house. And yes, I also made the little house with another Tim Holtz's die, the Paper Village. And here is the tutorial for that one.


Friday, 19 November 2021

Glittery vintage style Christmas ornaments with Stacked Baroque die by Tim Holtz

Hello everyone, after the glittery Christmas houses I'm here again with more glittery decorations. This time I made 3D ornaments from the Sizzix Thinlits die, Stacked Baroque by Tim Holtz.


For making these, I used glittery paper and for each ornament I cut out 5 pieces with the Stacked Baroque die. I folded them in half.


Then I started gluing the elements together. Before gluing the last one together, I placed a silver twine in the middle by forming a loop at the top. I also left the twine hanging out at the bottom.


When I was ready with this I put pearl beads to the top and to the bottom and fixed them with a knot. I aged the edges with Ground Espresso Distress Archival ink.


And it was ready.


I hope you like it! Thank you for stopping by!


Thursday, 12 November 2020

Christmas decoration - Log cabin ornament

After watching Tim Holtz fantastic demo, I decided to make my own wintery log cabin. So here it is:


Well, I don't write a tutorial for this because Tim tells and explains everything. 

But my house differs from Tim's house in two tiny details. I used vellum paper inside the house, instead of Frosted sheets or plastic sheets. And I put the vellum in the house before I assembled the pieces.

The other thing that I put a layer of Opaque Matte Texture Paste on the whole roof then I sprinkled with Ranger Clear Rock Candy glitters.


I hope you like my little house!!! Thank you for stopping by!!!


Monday, 9 November 2020

Christmas houses in pastel colours - hanging ornaments

Hello everyone, I'm here again with my second project for our November challenge over at the Country View Challenges where the theme is: Anything but a card

For my first inspirational project I chose the same die from Sizzix, Tim Holtz, it was the Paper Village die. I jus love these tiny 3D  houses! And this is my third project when I make hanging ornaments from them. 

Here you can see the gingerbread style houses and here the vintage houses with Distress colours. In both blogposts you can find tutorial, so this time there is no step by step tutorial.

For making the today project, I used DecoArt colours.


I used the following DecoArt Americana colours: Toffy Cream, Pink Chiffon, Blue, Chiffon, Shoreline, Pistachio Mint, Sweet Mint.

After adding two layers of paint to the white cut-outs I added a layer of Rayher Pearl Shimmer medium. 


To the roof and around the base I used again the Ranger Clear Rock Candy glitters.


I don't know if you can see it in the picture below but I used Nuvo Crystal Drops (Morning Dew) to make tiny door knobs.


If you have a project which is not a card, please don't hesitate to join our November challenge where a randomly selected winner can have a £20 voucher to spend at the Country View Crafts online shop.


Sunday, 1 November 2020

Colourful paper houses - Christmas ornaments

Hello dear crafters, it's already November and we have a new challenge at the Country View Challenges, the theme is Anything but a card and the lovely Jane will be your hostess.

For this challenge, I made Christmas ornaments, colourful paper houses with sparkly snow on their roofs.


For making these houses, I used Tim Holtz's latest Paper Village Thinlits dies and Distress paints. If you like these decorations I can tell you how I made them. For my tutorial, I chose the pink house to explain everything.

First of all, I cut out the structures from 300 gsm (110lb) watercolour paper. Then I folded along the crease lines.


Then I added two layers of Distress paint (Spun Sugar).


Then I inked the edges with Hickory Smoke Archival ink.


Since I wanted a more vintage look, I also added Vintage Photo Archival ink to the edges.


About the windows and doors, here I used only the doors of this set but I cut it off totally because actually it's bending, you can open it and close it. But for this design, I just needed a separate door. 

I didn't use the windows of this set, I used the window of Village Bungalow Bigz die instead.

You can find the heart in the Valentine Side Order die set. 

All the pieces were inked with Vintage Photo ink. Then I started to glue them on the house. In this picture, you can see that I placed the door 2cms from the edge.

Now all the pieces are on the right place.


I will continue with the roof. I cut it out from the same paper that I used for the structures. I inked the edges, then I made a hole in the middle for the twine.


Then I pulled the twine through the hole. Luckily, I have found a nice twine,  beige colour with gold threads.


In the end, I added an even layer of Ranger Glossy Accents and sprinkled with Ranger Clear Rock Candy glitters.


When it was dry, I placed the roof on the frames. 


I also created a base for my house. For this I cut out a 5,6x2,5 cms rectangle.


When I glued the house to the base and when it was dry, I added again Glossy Accents around the edges of the base and sprinkled again with the Ranger glitters.


For painting the house, I chose the following Ranger Distress paint colours: Spun Sugar, Squeezed Lemonade, Candied Apple, Broken China, Cracked Pistachio, Bundled Sage, Tumbled Glass. 

For sealing them and for giving them a little shine, I added a thin layer of Marabu Satin Matt Varnish.


If you have a project which is not a card, please don't hesitate to join our November challenge where a randomly selected winner can have a £20 voucher to spend at the Country View Crafts online shop.

With my little houses, I would like to join the challenge of The Funky Junkie Boutique Blog: Home is where the heart is


Thursday, 22 October 2020

Gingerbread houses from paper - Christmas ornaments

Hello dear crafters, I would like to show my latest makes, my gingerbread houses which were made with one of the the Sizzix Chapter 4 dies, the Tim Holtz Paper Village Thinlits die set.


This is not the first project when I use kraft paper to create gingerbread items. I used the same technique when I made my cards with Tim Holtz gingerbread men (Fresh Baked). You can see it here.

Well, I cut out my houses from kraft paper, then I  inked the edges with Vintage Photo Distress ink. 


Then I spattered them with diluted white acrylic paint and Vintage Photo Spray Stain.

And as you can see, I used only the door of this set. But I cut it off totally because actually it's bending, you can open it and close it. But for this design, I just needed a separate door. 

I didn't use the windows of this set, I used the window of Village Bungalow Bigz die instead.

You can find the heart in the Valentine Side Order die set.

Before I attached the roof on the house, I made a little hole in the middle, so I could add a jute twine through the hole. 

I think these little houses, hanging ornaments will be perfect as Christmas decorations. 


With my houses, I would like to join the Simon Says Stamp Monday Challenge: Not a card

Thank you for stopping by!!! Happy crafting!!!


Sunday, 22 February 2015

Sizzix - green and blue 3D egg paper ornaments

For my Easter garland today I have made some 3D ornaments.


The method of the embossing and the colouring of the eggs is the same as the paper garland's. You can see the tutorial here.


The method of gluing and putting the eggs together is the same as the Christmas paper ornament's. You can find the tutorial here.


Thursday, 18 December 2014

Sizzix - Christmas circle paper ornament

Sizzix - Ornements de papier aux cercles festonnés

I have made these ornaments for the weekend creative workshop.


I cut out the shapes with Sizzix Framelits Scallop Circle Die. The diameter of the circle is 5 cm.


I also needed some wooden beads and a thin string. 

I just had to fold the circles in half and then I glued them one another. Before I adhered the last circle I put the folded string in the middle. It's not difficult to prepare but it's quite showy.