Showing posts with label polka dot. Show all posts

Thursday, 9 July 2020

Interactive birthday card with crazy bird and dog

Hello crafty friends, I'm here with the second inspirational project for the July challenge of the Country View Challenges. The theme was chosen by the lovely Sue, Do more of what makes you happy.

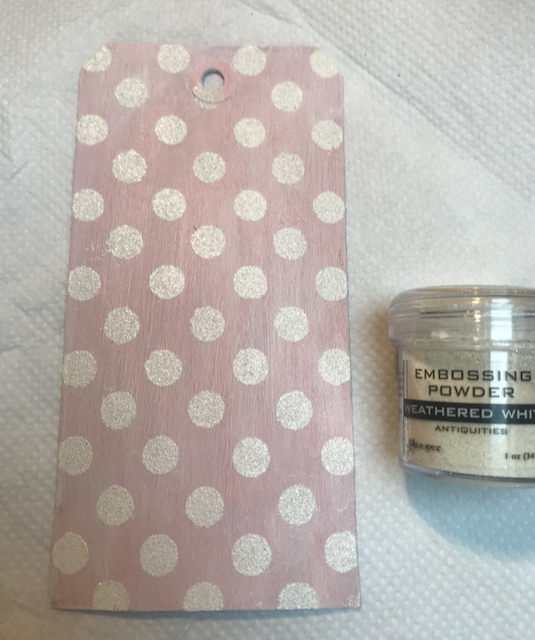
Well, you might know that I love polka dot and I love to create polka dot backgrounds. I also love Tim Holtz's products and mainly the Crazy series. What else? I love cheery cards too. For this card, I used one of my earlier cards as an inspiration (you can see it here). 

So here is my new interactive card:


This is not my first interactive card and when I posted my dinosaur card, I wrote a tutorial about how to make an image movable. 

What I used:

Stampers Anonymous, Polkadot Layering Stencil (THS068)

Stampers Anonymous, Crazy Talk (CMS236)

Stampers Anonymous, Crazy Things (CMS237)

Stampers Anonymous, Mini Crazy Birds&Things (CMS250)

Ranger Distress ink (Twisted Citron Pumice Stone, Broken China)

Ranger Distress Archival ink (Black Soot)

Ranger white embossing powder

Copic Sketch markers

etc.


I think this crazy bird is so cute how she hops (flies) up and down.


So if you have a project with things you love, please don't hesitate to join our July challenge where you can win a £20 voucher. I think this is a real anything goes challenge.

And here is a little video of how it works.


With my card, I would like to join the Simon Says Stamp Wednesday Challenge: Moving parts


Monday, 23 March 2020

Polka dot Easter banners

Hello everyone, I'm here with a pair of Easter banners. I got the inspiration for these banners from one of my earlier projects, a polka dot Easter tag.


The pink banner was painted with Victorian Velvet Distress paint, the green one with Bundled Sage. The Victorian Velvet was toned back with a little diluted white (Picket Fence) paint. 

When the panels were dry, I embossed dots on them with Ranger Weathered White embossing powder. For this, I used the Shifter Dots layering stencil.

The bows and the flowers were painted with Tumbled Glass.

I spattered the banners, the bunnies and the flowers with diluted Walnut Stain paint.


What I used:

Sizzix Bigz die, Cottontail by Tim Holtz

Sizzix Thinlits die, Funky Foliage by Tim Holtz

Sizzix Thinlits die, Friendship Words Script by Tim Holtz

Sizzix Thinlits die, Calendar Words Script by Tim Holtz

Stampers Anonymous, Shifter Dots layering stencil

Ranger Distress paints

Ranger Distress Archival inks

Ranger embossing powder

half pearls


I hope you like it!!! Thank you for stopping by!!! Stay at home and enjoy the crafting!!! xx


Monday, 9 March 2020

Easter card with Crazy Birds by Tim Holtz

Hello dear crafters, this is my second inspirational project for the March challenge of the Country View Challenges where the lovely Jane chose the theme: The eyes have it.

This time I created an Easter card with the Crazy Birds by Tim Holtz, because these birds definitely have speaking eyes.


I started my card with the oval. I cut out an oval from 300gsm watercolour paper using the Sizzix Thinlits die set, Stitched Ovals (661188). I used the biggest one. Then I took my Shifter Dots stencil and made dots on my oval paper. For this, I used Antique Linen Distress ink and Ranger Weathered White embossing powder.


Then I coloured my oval with Bundled Sage Distress ink.

What I used:

Sizzix Thinlits die, Stitched Ovals by Tim Holtz

Sizzix Thinlits die, Small Tattered Florals by Tim Holtz

Stampers Anonymous, Crazy Birds by Tim Holtz

Stampers Anonymous, Mini Crazy Birds&Things by Tim Holtz

Stampers Anonymous, Shifter Dots layering stencil by Tim Holtz

Stampers Anonymous, Crazy Things by Tim Holtz

Stampers Anonymous, Crazy Talk by Tim Holtz

Ranger Distress ink pads (Gathered Twigs, Antique Linen, Bundled Sage)


If you have a project with eyes, please don't hesitate to join our challenge where you can win a £20 voucher!


Friday, 6 March 2020

Easter tag with a bunny and polka dot background

Hello crafty friends, I'm here again with a new Easter tag. How I arranged the die-cuts it's similar to my yesterday tag but I made another background for my Easter bunny.


First I cut out a tag from chipboard and covered with gesso.


Then I painted with Victorian Velvet Distress paint.


Then I added a little diluted Picket Fence paint to tone it down. When it was totally dry, I made a polka dot pattern using the Shifter Dots layering stencil and the Weathered White embossing powder.


I inked the edges with Vintage Photo Archival ink.


And then I spattered with Walnut Stain paint. As you can see, I made just tiny speckles. I used the same brush and paint to splatter the other elements.


What I used:

Sizzix Bigz die, Cottontail by Tim Holtz

Sizzix Bigz die, Tag&Bookplates by Tim Holtz

Sizzix Thinlits die, Funky Florals 1 by Tim Holtz

Sizzix Thinlits die, Funky Florals 2 by Tim Holtz

Sizzix Thinlits die, Small Tattered Florals by Tim Holtz

Sizzix Thinlits die, Wildflowers Stems 1 by Tim Holtz

Sizzix Sizzlits die, Vintage Lace strip by Tim Holtz

Stampers Anonymous, Shifter Dots layering stencil

Idea-Ology, Chit Chat Seasonal sticker book

Idea-Ology, Long Fastener

Ranger Distress paints (Walnut Stain, Picket Fence, Victorian Velvet)

Ranger embossing powder (Weathered White)

Ranger Distress Archival ink (Vintage Photo)


With my tag, I would like to join the:

Simon Says Stamp Monday Challenge: Tag it!

Simon Says Stamp Wednesday Challenge: Something feminine


I hope you like it!!! Thank you for stopping by!!!


Sunday, 1 March 2020

Birthday card with a vizsla and polka dot background

Hello crafters, it's March and there's a new challenge at the Country View Challenges called: The eyes have it. For this challenge, I made a birthday card with a vizsla.


Have I ever told you that I love vizslas? Probably, yes! That's right, I love them because I'm Hungarian and because they are beautiful, elegant and smart dogs. This is why this crazy dog is often used for my projects and always coloured brown with a pinkish nose.

I started my card with a 14x14 cm square watercolour paper which was stencilled and heat embossed with dots. For this, I used the Stampers Anonymous Shifter Dots layering stencil and the Ranger Liquid Platinum embossing powder.


The next step was to ink the surface with Tumbled Glass ink.


Then I inked the edges with Stormy Sky ink and splattered the surface with Hickory Smoke reinker.


What I used:

Stampers Anonymous, Simple Sayings (CMS155)

Stampers Anonymous, Crazy Things (CMS237)

Stampers Anonymous, Crazy Dogs (CMS271)

Stampers Anonymous, Shifter Dots layering stencil (THS109)

Sizzix Impresslits, 3D Star Trim

Ranger embossing powder (Liquid Platinum)

Ranger Distress ink pads (Tumbled Glass, Stormy Sky)

Ranger Distress reinker (Hickory Smoke)

Ranger Distress Archival ink pad (Ground Espresso)

Idea-Ology, long fasteners

Copic Sketch markers


The 3D Star Trim was heat embossed with Liquid Platinum and attached to the bottom with long fasteners.


If you have a project with eyes, please don't hesitate to join our challenge where you can win a £20 voucher!

With this card, I would like to join the Simon Says Stamp Wednesday Challenge: Anything goes


Thursday, 13 February 2020

Polka dot house - hanging decor

I have made this tiny house for a friend who last year have found their dream house, dream home. Unfortunately, the house is still under renovation and they are looking forward to moving in. Until this precious moment, I try to cheer her up with this tiny house. 


I cut out the structure from 300 gsm paper. Then I took a 200 gsm paper and I stamped the polka dot pattern from the Stampers Anonymous Dots&Floral set on. After I heat embossed with Ranger white embossing powder. 

When it cooled down, I inked the surface with Hickory Smoke ink and cut out the structure again.


Then I glued the lighter paper on the heavy cardstock.


On the front of the house, I added tiny windows and a little door, and the number of their future house.

For the roof, I used the Nordic pattern of the Stampers Anonymous Plaid&Nordic stamp set. The process was the same, I stamped the Nordic pattern on the 200gsm paper, then heat embossed with white, then inked with Hickory Smoke.


On the back, I wrote a text: It feels like home. And I added a little heart too.


What I used:

Sizzix Bigz L die, Tiny Houses by Tim Holtz - I used the bigger structure

Sizzix Bigz XL die, Village Dwelling by Tim Holtz - for the door

Sizzix Bigz die, Village Bungalow by Tim Holtz - I used the smaller window

Sizzix Thinlits die, Alphanumeric Label by Tim Holtz - for the text

Sizzix Side Order, Valentine by Tim Holtz - for the tiny heart

Stampers Anonymous, Plaid&Nordic by Tim Holtz (CMS243)

Stampers Anonymous, Dots&Floral by Tim Holtz (CMS220)

Idea-Ology, Countdown Brads

Ranger embossing powder, white

Ranger, Distress ink (Hickory Smoke)

Ranger Archival ink (Hickory Smoke)


I hope you like it!!! Thank you for stopping by!!!

Come here tomorrow and you can see the matching card!


Thursday, 6 December 2018

Birthday card with cupcake

When I was making this card I was thinking of the colours of the pastry shops, especially the Ladurée. I'm not a huge fan of the pastires of the Ladurée - actually, I'm not a huge fan of things made with sugar - but I love the style, the decorations, the advertisements and the wrappings of Ladurée. 

So I created this:


The first layer of this card was a pastel green cardstock which was embossed using the Polkadot layering stencil by Tim Holtz (THS068) and the Ranger white embossing powder. The edges of the green rectangle was inked with a brown distress ink (Gathered Twigs).


The frame was cut out from chipboard and I painted gold.

The roses were in my stash, I made them earlier.

The cake was stamped on a watercolour paper and was coloured with Ranger Distress markers.

As for the background in the frame ... for this, I used the Reflections stamp and the Ranger Archival Potting Soil ink pad. After stamping I toned back with white acrylic paint, then spritzed with Ranger Distress Spray Stain (Vintage Photo) using a brush. In the end, I inked the edge with Vintage Photo ink.


What I used:

Stampers Anonymous, Birthday Blueprints by Tim Holtz (CMS153)

Stampers Anonymous, Reflections by Tim Holtz (CMS111)

Stampers Anonymous, Hashtags by Tim Holtz (CMS183)

Sizzix Bigz die, Ornate Frame by Tim Holtz (658720)

Sizzix Bigz die, Tattered Florals by Tim Holtz (656640)

Sizzix Thinlits die, Small Tattered Florals by Tim Holtz (661806)

Sizzix Thinlits die, Garden Greens by Tim Holtz

Stampers Anonymous layering stencil, Polkadot by Tim Holtz

Ranger embossing powder (white)

Ranger Distress markers

Ranger Distress ink pads (Gathered Twigs, Vintage Photo)

Ranger Distress Spray Stain (Vintage Photo)

Ranger Archival ink (Potting Soil)

etc.


With my card, I would like to join the Simon Says Stamp Monday Challenge: 'B' is for? - birthday


I hope you like it!!! Thank you for visiting my blog!!!


Sunday, 23 September 2018

Halloween wine tag with a witch

Hello everyone, I couldn't resist the new challenge at the Simon Says Monday Challenge: It's a wrap, so I made a Halloween wine tag.


For this, I used the My Favorite Things wine tag die but decorated with Tim Holtz stamps, stencils and inks.

First of all, I took a 300 gsm watercolour paper, the new dot shifter stencil and the Ranger Archival inks (Tiger Lily, Jet Black) and made a dotty background.


Then with diluted Ranger Distress inks (Antique Linen, Brushed Corduroy), I gave the tag a vintage look.

When my tag was dry, I stamped the cobwebs (Webs and Damask CMS276) on the tag. After I inked the edges with Ground Espresso and Black Soot inks.

I stamped the witch (Halloween Silhouettes CMS115) on the tag and heat embossed using black embossing powder.

Finally, I stamped the texts on the tag from the Regions Beyond set (CMS274).


I hope you like it!!! Thanks for stopping by!!!


With this tag, I would like to join the September TIMI challenge of the Craft Stamper Magazine: Anything goes.


Friday, 8 June 2018

Card with ice cream blueprint by Tim Holtz

When you got your first three scoops ice cream from your mum or dad, you could feel that you finally became a big girl or a big boy! So it was your #bestdayever!


I must admit that for this card I found the inspiration on Pinterest. Another crafter, Emily made a gorgeous card with Tim's ice cream cone blueprint and she put the scoops on the top of the other. You can see it here.

But otherwise, everything else is mine :-) You know that I love the polka dot background and I use a lot this frame in my projects. 

My chosen colours are very similar to the Ladurée macarons and advertisements.


What I used:

Stampers Anonymous, Treats Blueprints by Tim Holtz (CMS195)

Stampers Anonymous, Hashtags by Tim Holtz (CMS183)

Tim Holtz Layering Stencil, Polkadot (THS068)

Sizzix Bigz Die, Ornate Frame by Tim Holtz 

Ranger embossing powder, white

Ranger Distress markers

Ranger Archival ink pad (Jet Black)

Ranger Distress ink pad (Walnut Stain)

DecoArt Americana paints (Pineapple, Glorious Gold)


With my card, I would like to join the:

- Simon Says Stamp Monday Challenge: All things bright and beautiful

- CropStop challenge: June link party

- That's Crafty: A summer's day challenge


Thank you so much for stopping by!!!