Showing posts with label umbrella. Show all posts

Monday, 9 December 2024

Vintage Hungarian Christmas cards #146

Are those money bags on the little boy's sledge and on the snowman's arm? It certainly looks like it, because there are zeros written on the outside of the bags. And why are the boy and the snowman pointing in the same direction? Very strange.


This card was posted in 1926.


You can find my other vintage Christmas cards, just click on the label - old Christmas cards - on the sidebar.

Thursday, 15 September 2022

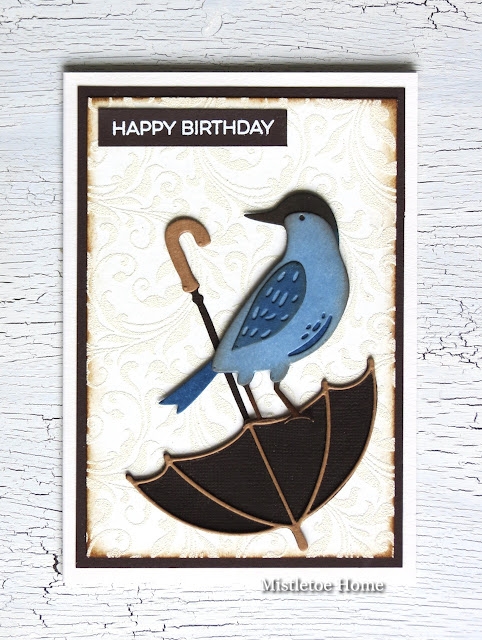
Birthday card with blue bird and umbrella

Hello everyone, the card that I want to show you right now was inspired by one of my older cards. That one, but that card was such a huge card and I wanted a smaller, more useful card. So I made this one:


When a few days ago started to make a thank you card with pumpkins, I embossed two backgrounds with the Flourish stamp by Tim Holtz, one with Ranger Sage embossing powder, and the other with Weathered White. The Sage was used for the pumpkins, so the white became the background of the birthday card.

The bird was coloured with Faded Jeans Distress ink, Stormy Sky Distress Oxide ink, Vintage Photo and Ground Espresso Distress inks.

The sentiment is not from Tim, it's a My Favorite Things stamp. It was heat embossed with white embossing powder on brown card stock.


What I used:

Sizzix Thinlits die, Feathered Friends (664433)

Sizzix Thinlits die, The Gent (665202)

Stampers Anonymous, Lattice&Flourish (CMS257)

My Favorite Things Stamp, Essential Sentiments

Ranger Distress inks (Faded Jeans, Walnut Stain, Ground Espresso)

Ranger Distress Oxide ink (Stormy Sky)

Ranger embossing powders (Weathered White, White Super Fine)

etc.


With my card I would like to join the Simon Says Stamp Monday Challenge: Die Cuts


Wednesday, 8 December 2021

Vintage Hungarian Christmas cards #103

I'm here with a snowman postcard. What was interesting for me in this postcard that the snowman was not a man in a hat on his head but a woman with a scarf on her head. How often do you see the snowman represented as a "snowwoman"? Not often, I'm sure!


This postcard was posted in 1932.

You can find my other vintage Christmas cards, just click on the label - old Christmas cards - on the sidebar.

Saturday, 17 April 2021

Birthday card with a red bird

Let me show you my second inspirational project for our April challenge, the Birds and the bees. If you missed my firs project with Arthur, you can find it here


To begin with, I took a 300gsm watercolour paper and blended Shabby Shutters and Bundled Sage Oxide inks to the surface.


Then I spritzed with water.


Then I added Ranger Opaque Crackle Texture Paste through a Stampers Anonymous stencil. When the first part was dry, I continued the stencilling. 

In the end, I spattered my background with gold paint and inked the edges of my 6x6" panel with Vintage Photo ink.

For the bird, I used 300gsm watercolour paper too and I coloured the pieces with Fired Brick and Abandoned Coral Distress inks. I inked the edges with Vintage Photo and Walnut Stain inks.

For the umbrella, I used Kraft paper and brown textured paper.

What I used:

Sizzix Thinlits die, Feathered Friends by Tim Holtz

Sizzix Thinlits die, Handwritten Celebrate by Tim Holtz

Sizzix Thinlits die, The Gent by Tim Holtz

Stampers Anonymous layering stencil, Floral by Tim Holtz

Ranger Opaque Crackle Paste

Ranger Distress Oxide ink pads (Shabby Shutters, Bundled Sage)

Ranger Distress ink pads (Fired Brick, Abandoned Coral, Walnut Stain, Vintage Photo)

Idea-Ology Fasteners


If you have a project with birds or bees (or both), please don't hesitate to join our April challenge where a randomly selected winner can have a £20 voucher to spend in the Country View Crafts online shop.


Thursday, 1 April 2021

Now what? - Arthur is sitting on suitcases and frowning

Now what? That's the question Arthur is struggling with right now. But don't worry, Arthur is a wise owl, he can figure out the answer. 


I have made this card for our current challenge over at the Country View Challenges. The theme is The birds and the bees and the lovely Sue will be your hostess in April.

For making this card, first I cut out the pieces of Arthur, then I started to paint the parts with Distress Pumice Stone paint. To the edges I blended Vintage Photo Archival ink. 


Then I added a little brown (Gathered Twigs) for the pieces I had to glue on the top. For edges of these pieces, I used Ground Espresso Archival ink. 


Then I spattered Arthur with Walnut Stain paint.


His eyes got Mowed Lawn colour, his beak Carved Pumpkin with a little brown. Here you can see all the paints and inks I used for colouring Mr. Cuteness.

For the background I took a watercolour paper and started to blend Twisted Citron and Mowed Lawn ink. Then I made patterns on the paper with a stencil and Mowed Lawn Oxide ink. I spattered the background with Vintage Photo Spray Stain and inked the edges with Gathered Twigs.

Since I found the background too bold, I toned back the colour with diluted Picket Fence paint.

The suitcases were made earlier, you can see that post here.

What I used:

Sizzix Thinlits die, Colorize Arthur (664730)

Sizzix Thinlits die, The Gent (665202)

Sizzix Thinlits die, Alphanumeric Classic Upper (664223)

Sizzix Bigz die, Baggage Claim (664439)

Stampers Anonymous layering stencil, Linen (THS061)

Ranger Distress paints (Carved Pumpkin, Gathered Twigs, Mowed Lawn, Pumice Stone, Walnut Stain)

Ranger Distress ink pads (Gathered Twigs, Mowed Lawn, Twisted Citron)

Ranger Distress Oxide ink pads (Mowed Lawn)

Ranger Distress Archival ink pads (Vintage Photo, Ground Espresso)


If you have a project with birds or bees (or both), please don't hesitate to join our April challenge where a randomly selected winner can have a £20 voucher to spend in the Country View Crafts online shop.


Saturday, 5 October 2019

Umbrella man with black and white bokeh background

I made this card as a second inspirational project for our October challenge, called Bokeh. And this month the lovely Sue will be your hostess. 

This time I chose an old but one of my favourite Bigz dies, the Umbrella Man. And I created a black and white bokeh background for him.


And now I show you how I made this bokeh background. 

I took a 300gsm watercolour paper and inked with Hickory Smoke and Black Soot Distress inks. Then, to fix these colours I blended Watering Can and Jet Black Archival ink, but you can use Tim's Archival inks because the Black Soot and the Hickory smoke exist in Archival ink as well.


Then I used a handmade stencil (I cut out circles into a plastic sheet) and sponged Picket Fence ink through the circles.


I smeared more ink through the smaller circles to achieve a nice bokeh effect.


I sprayed my background with a fixative, then I cut out the Umbrella Man from black cardstock and adhered to the card. I also added a text from Tim's sticker book.


So if you like the bokeh technique, please join our October challenge where you can win a £20 voucher of the Country View Challenges. 


Monday, 14 May 2018

Colour pop - black and white canvas with red umbrella

Hello everybody and happy Monday! I'm here with a black and white canvas with a splash of colour, a bold red umbrella. For this canvas, my inspiration was my previous black and white canvas with Tim's umbrella man.

And since I made two Paris cards last week, I insisted on the Paris theme too.


Although it was a primed canvas, I put one layer of gesso on the surface and when it was dry I tapped the different shades of grey onto the canvas with a sponge. 


It's quite minimalist but I like it this way, so I didn't want to ruin it with adding other cutouts or text.


And since my background is ombré, I would like to join the Simon Says Monday Challenge: Ombré


MentésMentés

Monday, 23 April 2018

Rainy day - card with MFT stamps

Hello everybody and happy Monday! Let me show you my latest card that I created with MFT stamps.


I wanted to make a sharp contrast between the background and the images because Donna Mikasa's card was really inspiring. 

I also liked Sandy Allnock's diagonal rains that you can see here.


What I used:

MFT BB, Puddle Jumper

MFT BB, Rain or Shine

MFT BB, You're Super

Die-Namics A2 Rectangle dies, STAX1

Sakura Glaze (white)

Copic Sketch markers

Ranger Archival ink pad (Watering Can)


I hope you like it! Thanks so much for stopping by! xx


MentésMentésMentésMentés

Wednesday, 13 April 2016

Umbrella man in April shower - hanging

I bet you know exactly that spring/summer weather when the sun is shining but somewhere on the horizon there are gathering rainclouds and everything becomes grey. I wanted to visualise this when it's raining but the sun is still shining.


I created a 14x18 cm board from a chipboard. I gessoed with 3 layers then I applied different colours of chalk crayon. I spritzed the surface to blend the colours. 


First I stamped  with Ranger Archival Ink (Coffee) then with Ranger Distress Embossing Ink for the Ranger Distress Embossing Powder (Peeled Paint).


I inked the edges with Ranger Distress Ink (Gathered Twigs).


And below you can see that I put tiny drops from the Ranger Glossy Accents all around the surface to create raindrops.


What I used:


PaperArtsy, Eclectica, Kay Carley 01,02


Ranger Distress Embossing Powder (Peeled Paint)


chipboard, wire

chalk crayons


With my board I would like to join the following challenges:

The Monday Challenge of the Simon Says Stamp blog: April Showers Bring May Flowers

The April Challenge of the Craft Barn Blog: April Showers

A Vintage Journey: Spring is in the air

Craft Stamper Magazine, TIMI Challenge: Spring Flowers


Monday, 1 February 2016

Canvas with umbrella man

The February challenge theme on the Country View Challenge blog was chosen by Sue. She wanted us to make projects with backgrounds we would like to: MAKE YOUR OWN BACKGROUND 


For this challenge I have made a canvas with Tim Holtz umbrella man. 


Lately I have seen a beautiful black and white wintry photo which was my inspiration. A very talented young Hungarian photographer, Klára Rajnai made this picture. Beautiful, isn't it?


Now here is my tutorial.

First I took a 18x24 cm canvas and although this was a pre gessoed canvas, I still put another layer of gesso.


I tried my cutouts on the canvas.


I painted the canvas grey. Actually, I tapped the grey acrylic paint with a sponge onto the canvas.


I stamped trees on the canvas with StazOn black ink.


When the stamping was not perfect I made the corrections with black acrylic paint.


After I misted my background with white acrylic paint and with a sponge. For this I used Amsterdam white paint because there are hardly any pigments in it but for this misting this is perfect :-)


Then I glued the cutouts onto the canvas. For this I used Tacky Glue Transparent Glue.


Then I mixed my Schmincke white acrylic paint with some water and with a brush I started to spritz the paint. When it was dry I put a layer of Schmincke acrylic medium to protect my canvas. And it was ready!


Don't forget, you can join this challenge to show us your lovely background! At the end of the month you can win a £20 voucher! Happy crafting!


What I used:


Tuesday, 15 December 2015

Vintage Hungarian Christmas cards #16

Although today I have already posted two different things, I'm here again with a vintage Christmas postcard.


On the card there are two children who are hiding behind an umbrella from the snowstorm.


The card dates from the 1920'.


You can find my other cards under the label: 'old Christmas cards'.