Showing posts with label flowers. Show all posts

Friday, 28 March 2025

Thank you card with spring colours

I know it's been a long time since I last posted something here. I really haven't had time to create lately, teaching has been taking up so much of my time. But here I am with this spring thank you card.


This card is started with the background, but I didn't do it now, I have found it by accident. The yellow stripes were darker so I muted the colour with diluted white paint. Then I spritzed with brown paint and inked the edges with Vintage Photo Archival ink.


For the flowers and leaves I used two Sizzix die sets: Brushstroke Flowers 2 (665210) and Bloom Colorize (665208). I painted them with acrylic paints. The green was a mixture but the pink was Spun Sugar and maybe I added some white. 

The text was cut out from dark brown paper with Sizzix Handwritten Celebrate Thinlits die (660215).


Tuesday, 29 October 2024

Thank you card with Floristry stamp set

Hello everyone, here is my second card that I made with the Floristry stamp set (CMS485) by Tim Holtz. 


As with the previous card, I stamped the flowers on Neenah Solar White paper and coloured it with Copic Sketch markers.


Then I went over the whole panel with a light brown marker. After I added Antique Linen and Brushed Corduroy inks to the edges. Then I tapped diluted white paint to the whole panel. I didn't only put white paint on the edges, like the previous card, but also on the flower bouquet. In the end, I splattered with white paint.


The text is from the Saying Stuff (THJ009) stamp set and heat embossed with Princess Gold embossing powder.


Tuesday, 22 October 2024

Best wishes card with bouquet of the Floristry stamp set

Hello everyone, it's been a while since I last posted something here on my blog. I have my excuses for the silence but I don't want to bother you with personal things here.


For the card I just finished, I used Tim Holtz Floristry stamp set and it looks like this:


I stamped the big bouquet on Neenah Solar White paper with Memento Tsukineko Espresso Truffle ink and coloured with Copic Sketch markers.


Then I went over the whole panel (flowers and white parts too) with a light brown marker.

I cut off the unwanted parts, then I inked the white parts with Antique Linen and the edges with Brushed Corduroy. Then I dabbed diluted white paint to the edges using a sponge. Then I spattered with brown paint.


The text was stamped on black paper with embossing ink and heat embossed with Princess Gold embossing powder.


I hope you like it and I hope I can create more often from now on.


Monday, 10 April 2023

Thank you card with Blossom by Tim Holtz

I hope you all had a wonderful Easter! But what I would like to show you today is not Easter at all. You could call it spring, but it's more like a thank you card with flower.


My sister needs thank you card so I decided to make one, and my new Blossom die set was a perfect choice. 

My background is very similar to one of my previous cards where I wrote a tutorial. So please hop there if you would like to know the process. 

The big flower was cut out from white watercolour paper then I coloured the petals with Squeezed Lemonade, Mustard Seed and Fossilized Amber.

For the leaves, I used Forest Moss and Peeled Paint. 

The branches are from the Wildflower Stems 1 set and I think I coloured them with Walnut Stain. 

I spattered the whole card with diluted white paint.

The text is from an MFT stamp set, Bitty Thanks&Gratitude, and heat embossed with white embossing powder on black paper.


Thursday, 19 May 2022

Thank you card with red brushstroke flowers

So if you like the red then, it's your type of card. I added my flowers a really bold red colour to pop out from the background. 


For this card I got the background from one of my earlier projects, a tag. But there I didn't post any pictures about the creation and I didn't explain how I made it. 

So I took a 300 gsm paper and covered with an even layer of gesso.


When it was dry, I fixed the stencil on the paper with washi tape. 


With a piece of sponge, I dabbed the grey acrylic paint on the paper through the stencil. When it was dry, I spattered with white acrylic paint.


I inked the edges with Hickory Smoke Archival ink, then I placed and glued on a red panel.

For the flowers I used 300 gsm watercolour paper and blended Distress inks onto the surface. First Candied Apple, then Barn Door. The top layers were coloured with Abandoned Coral marker and with Rusty Hinge the middle part. All the edges of all pieces were inked with Gathered Twigs.


The leaves were coloured with Peeled Paint first, then with Rustic Wilderness.


Here I inked the edges with Gathered Twigs.


What I used:

Sizzix Thinlits die, Handwritten Celebrate (660215)

Sizzix Thinlits die, Brushstroke Flowers 2 (665210)

Stampers Anonymous, Shifter Stripes (THS108)

Ranger Distress inks, markers


With my card, I would like to join the Simon Says Stamp Monday Challenge: Add texture


Monday, 21 March 2022

Card with Brushstroke Flowers by Tim Holtz

Hello everyone, here is my second inspirational project for our March challenge over at the Country View Challenges where the theme is Mother's DayAs with my first creation, I made a floral card with a striped background. But here I chose the text "thank you" because I think we have a lot to thank our mothers for.


And here is my tutorial.

I cut out a large rectangle panel from 300 gsm watercolour paper. Then I started to blend Faded Jeans Archival ink to the surface through stencil but I changed my mind and used Faded Jeans paint instead. 


I cut out the flowers from 300 gsm paper and started to colour them with Distress paints.


I used Kitsch Flamingo for the first layer.

And Spun Sugar for the second layer.


The third layer remained white. Then I inked the edges of all the edges with Potting Soil Archival ink. When I was ready with this, I assembled the flowers.


I coloured the leaves with Bundled Sage and Rustic Wilderness. 


I inked the edges of the lighter-coloured leaves with Olive Archival ink. Here you can see how the leaves looked before and after.

Then I added to all the edges Potting Soil, even to the card.

Then I stamped randomly onto the surface of the rectangle panel with The Professor 2 stamps using Hickory Smoke Archival ink.


Then I toned back with diluted white paint.


I spattered the panel with diluted brown acrylic paint. When it was dry, I glued the flowers on the surface. In the end, I spattered the panel with diluted white paint.


What I used:

Sizzix Thinlits die, Brushstroke Flowers 2 by Tim Holtz (665210)

Sizzix Thinlits die, Alphanumeric 3/4" by Tim Holtz (660056)

Stampers Anonymous, The Professor 2 by Tim Holtz (CMS395)

Stampers Anonymous, Shifter Stripes stencil (THS108)

Ranger Distress paint (Kitsch Flamingo, Spun Sugar, Rustic Wilderness, Bundled Sage, Faded Jeans)

etc.


So if you have a Mother's Day project, please don't hesitate to join our challenge where a randomly selected winner can have a £20 voucher in the Country View Craft Shop.


With my card, I would like to join the Simon Says Stamp Monday Challenge: Feminine


Friday, 17 September 2021

CAS card with MFT Lavish Lilies

Hello everyone, I would like to share with you my CAS card that I made with the beautiful lilies by MFT Stamps.


The lilies were coloured with Copic Sketch markers. I added three sequins for some interest. I hope you like it!

And here is a close-up photo.


Thursday, 1 July 2021

Tag with wildflowers

This month I am that lucky person who is the host of the July challenge of the Country View Challenges. The theme that I chose is Use a stencil or two. This means you have to use at least one stencil to join our challenge with your project. It's really not complicated, is it?

Here is my first project, a tag that I made with only one stencil but I used three times with three different embossing powders. 


While I was making this tag, I took several photos. So I can give you a step by step tutorial.

First, I cut out a tag from 300 gsm watercolour paper with Sizzix Movers&Shapers Tag&Bookplates die. Then I coloured the tag with the following Distress paints: Speckled Egg, Bundled Sage, Mowed Lawn. For this, I always use a piece of sponge and I add the paint to the surface with tapping movements.


Then I toned back the colours with a layer of watered Antique Linen paint.


When it was completely dry, I inked the edges with Vintage Photo Archival ink. When I use Distress paints, I always use Archival ink instead of the original ink.


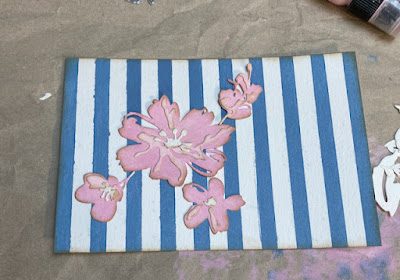
Then I started the heat embossing. For this I used Tim's Wildflower stencil and embossing ink.


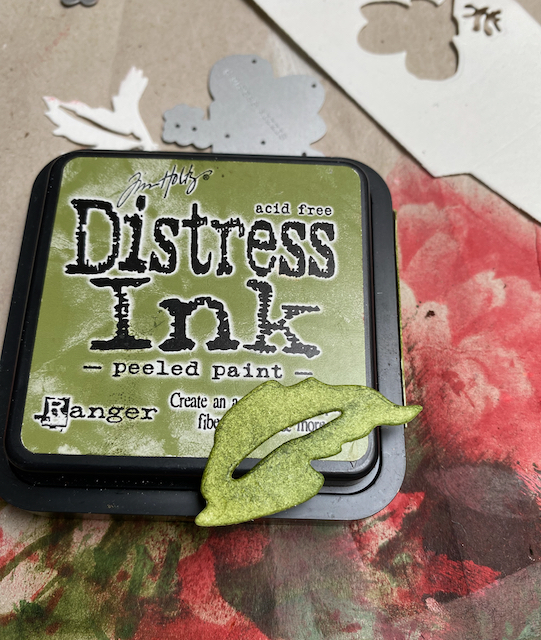
First I heat embossed the flowers with Peeled Paint Distress embossing powder.


Then I placed the stencil a little lower and a little right and I put embossing ink to the tag through the stencil. For this time, I used Weathered White embossing powder.


The process was the same for the third time but I used Potting Soil embossing powder.


At this point, I realised that the edges need darker colour so I inked the edges with Ground Espresso Archival ink.


Then I spattered the tag with Picket Fence paint. In the end, I stamped the text with Black Soot Archival ink and cut it with Tim's Trimmer and glued to the bottom of the tag. The text is part of the Tiny Text stamp set.


What I used:

Sizzix Movers&Shapers die, Tag&Bookplates 

Stampers Anonymous layered stencil, Wildflower

Stampers Anonymous stamp set, Tiny Text

Ranger Distress Archival inks (Ground Espresso, Black Soot, Vintage Photo)

Ranger Distress paints (Antique Linen, Picket Fence, Speckled Egg, Mowed Lawn, Bundled Sage)

Ranger embossing powders (Weathered White, Potting Soil, Peeled Paint)

etc.


So if you have a project in which you use a stencil or two, please don't hesitate to join our July challenge where a randomly selected winner can have a £20 voucher to spend in the Country View Crafts online shop.

With my tag, I would like to join the Simon Says Stamp Monday Challenge: Anything Goes


Thursday, 15 April 2021

Thank you tag with Bloom Colorize flowers

Hello everyone, I would like to show you my thank you tag where I used Tim Holtz Bloom Colorize flowers as a focal point.


And if you like it, here is a tutorial.

I cut out a tag from chipboard with the retired Sizzix Movers&Shapers die, Tag&Bookplates. Then I put a layer of gesso to the surface.


Then I painted the whole tag (both sides) with Bundled Sage Distress paint. When it was dry, I blended Peeled Paint Archival ink through the Shifter Stripes layering stencil.


When the ink was completely dry, I toned back the colours with wet Picket Fence paint. Later, I inked the edges with Vintage Photo Archival ink.


Then I wanted to add some stamping. So I chose a beige colour ink (Tsukineko Memento Desert Sand) for this.


The pieces of the bloom flowers were mostly cut out from the premade papers which I created  two months ago after a Tim Holtz demo.


For assembling the flowers, I used the Sizzix YouTube video.

What I used:

Sizzix Movers&Shapers die, Tag&Bookplates

Sizzix Thinlits die, Tiny Type Lower Case

Sizzix Thinlits die, Bloom Colorize

Stampers Anonymous, Shabby French

Stampers Anonymous, Tiny Toadstools

Ranger Distress paints (Shabby Shutters, Picket Fence)

Ranger Distress Archival ink (Vintage Photo, Peeled Paint)

Ranger Distress inks

etc.


With my tag, I would like to join the Simon Says Stamp Monday Challenge: Not a card