Showing posts with label gentleman. Show all posts

Tuesday, 15 July 2025

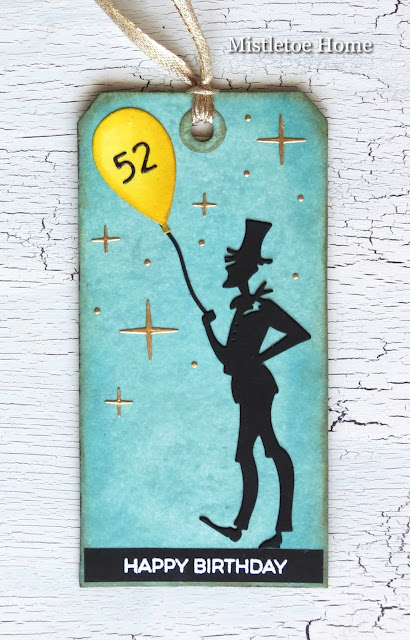
Masculine birthday tag with a gentleman silhouette

Hello everyone, I'm here with a masculine birthday tag that I created for my husband who just turned 52. For this, I used the gentleman of the Sizzix, The Park die set by Tim Holtz (665204).


I cut out a tag shape with Sizzix Bigz die, Tag&Bookplates (656938) from white paper, then I blended Speckled Eggs and Tumbled Glass Distress inks to the surface. I added Frayed Burlap to the edges.


I cut out the gentlemen twice from black paper then I glued them together. 

For the balloon, I used white paper and the Sizzix Celebrate Colorize die set by Tim Holtz (666285). I coloured with Squeezed Lemonade and Mustard Seed Distress inks.

The numbers were cut out with the Sizzix Alphanumeric Label die (664177) from black paper.


For the stars, I used again the Celebrate Colorize set and gold metallic paper from the Idea-Ology Kraft Paper 8x8" paper pad.

I used the same paper for the dots, but the Sizzix Sidekick Side-Order die, Birthday by Tim Holtz (662703).

The text is part of the My Favorite Things, Essential Sentiments stamp set. I heat embossed with Ranger fine white embossing powder on back paper.

The final touch was adding a gold ribbon to the hole.


Tuesday, 7 May 2024

Birthday card with The Count by Tim Holtz

Let me show you my birthday card that I made for a friend. That's the first time that I use The Count not only on a Halloween card but for a completely different occasion. Actually, the inspiration to use the count for other things came mainly from Emma Williams, but you can also find ideas from other crafters on Instagram and Pinterest where the count is on the beach or in the mountains for example.


For the background, I took a 300 gsm watercolour paper and I started to blend Cracked Pistachio and Pine Needle to the surface. The Cracked Pistachio to the middle and the Pine Needle to the edges mainly.


Then I added a little Ground Espresso and Black Soot to the very edges. I protected my inked surface tapping matt varnish with a sponge.


The suitcase was painted with Prize Ribbon paint.


The decorative elements of the suitcase and the handle were cut from kraft paper. For the darker parts, I just added brown Distress ink. 


And here is the tutorial for the count with step by step pictures.

I cut out the count from 300 gsm watercolour paper and coloured the head part first with Antique Linen, then with Brushed Corduroy ink.


Then all the other layers of the head were coloured with the same inks but my goal was to get lighter and lighter layers. So the top layer was just coloured with Antique Linen.


Under the head, I coloured The Count's body with Black Soot ink. But I also cut out the whole Count from black paper. I cut off the head part and I glued to the main layer.


Then I started to assemble The Count.


The Count's hat and lorgnette were cut out with the dies of The Gent Thinlits set. I got the umbrella from The Park set and the bow tie from Tailored die set.


What I used:

Sizzix Thinlits die, The Count (665557)

Sizzix Thinlits die, Tailored (666289)

Sizzix Thinlits die, The Park (665204)

Sizzix Thinlits die, The Gent (665202)

Sizzix Bigz die, Baggage Claim (664439)

My Favorite Things, Bitty Birthday Wishes

Ranger Distress inks (Cracked Pistachio, Pine Needle, Ground Espresso, Brushed Corduroy, Antique Linen, Black Soot)

Ranger Distress paint (Prize Ribbon)

etc.


Wednesday, 30 August 2023

Birthday card with one of the Gentlemen by Tim Holtz

It is not only my mother-in-law's birthday in October, but also my mum's. So after the blue gentleman card that I created for my mother-in-law, I made another version for my mum. 


I used the same technique for both backgrounds. You can check out the tutorial on the previous card.

Here I used Spun Sugar Oxide ink, then Picked Raspberry Distress ink.


After sealing the surface with Distress Collage Medium I inked the edges with Picked Raspberry Archival ink, then with Ground Espresso.


What I used:

Sizzix Thinlits die, Gentlemen (666286)

Sizzix Thinlits die, Alphanumeric Bulletin (666281)

Sizzix Thinlits die, Cozy Winter (665574)

Sizzix Thinlits die, Celebrate (666285)

Stampers Anonymous, Crazy Talk (CMS236)

Stampers Anonymous, Linked Circles (THS159)

Ranger Distress inks 

Ranger Distress Oxide inks

Ranger Distress Collage Medium

Ranger Distress embossing powder (super fine white)

etc.


As you can see, I put some yellow stars on this card, that you can't find on the other card. There were already a lot of yellow elements there, it would have been too much yellow with the stars. 


Thursday, 10 August 2023

Birthday card with one of the Gentlemen

I made this card for my mother-in-law's 80th birthday. Her birthday will be just in October but I like to be prepared in time.


For the background I took a watercolour panel and I inked the surface with Tumbled Glass and Speckled Egg Distress Oxide inks. Then I blended Faded Jeans ink through the Linked Circles stencil. Then I inked the edges with Chipped Sapphire ink.


To give a protection to my panel, I dabbed Distress Collage Medium to the surface.


The bird and the gentlemen was cut out from black paper twice and then glued them together. The numbers and the balloon was cut out from white watercolour paper and coloured with Distress inks (Squeezed Lemonade, Mustard Seed, Fossilized Amber). The text was stamped with embossing ink on black cardstock, then I heat embossed with white embossing powder.


What I used:

Sizzix Thinlits die, Gentlemen (666286)

Sizzix Thinlits die, Alphanumeric Bulletin (666281)

Sizzix Thinlits die, Cozy Winter (665574)

Sizzix Thinlits die, Celebrate (666285)

Stampers Anonymous, Crazy Talk (CMS236)

Stampers Anonymous, Linked Circles (THS159)

Ranger Distress inks 

Ranger Distress Oxide inks

Ranger Distress Collage Medium

Ranger Distress embossing powder (super fine white)

etc.


With my card, I would like to join the Simon Says Stamp Monday Challenge: Happy Birthday


Wednesday, 1 March 2023

Masculine birthday cards for twins - Gentlemen by Tim Holtz

Hello everyone, I'm here with my first inspirational project for the March challenge of the Country View Challenges. The theme is Birthday card for a man and the lovely Corrie is the hostess of this theme.

Well, for the first time this month I would like to show you two birthday cards that I made for twins, Peter and David. Peter's wife asked me to make a card duo for her husband and brother-in-law's 60th birthday, and I think the Gentlemen die set was just perfect for this occasion.


I'm just saying that the cards are huge, exactly A5 size.

So I cut an A4 watercolour paper (300gsm) in half and blended Weathered Wood ink onto the surface.


Then I spritzed with Speckled Egg Distress Oxide Spray ink.


Then I rubbed diluted white paint onto the surface with a piece of sponge. I like this technique, because with this a mute a little the original colour and it is also a great protection for the colours. When it was dry, I cut the panel a little smaller then inked the edges with Hickory Smoke and Frayed Burlap Archival inks. I finished off the background by splattering it with watered gold paint (Glorious Gold).

Now, the balloons. I cut out for balloons with one of the balloon dies form the Celebration die set. And I coloured them green and blue with the following inks. For the blues I used Tumbled Glass, Salty Ocean and Blueprint Sketch, for the greens Twisted Citron, Mowed Lawn and Rustic Wilderness. I glued the numbers on the balloons and for the numbers I used added the Alphanumeric Label die set. I also added a layer of varnish to the surface. I applied this with a sponge not with a brush, because with brushstrokes I could wipe off the ink from the surface. Just dab the sealing with a sponge gently.


Each gentleman was cut out three times from 300gsm black paper to give them dimension. I glued them together then I added a black paint sealing to the top layer.


For the nameplate, I cut two strips from grey paper, I blended diluted white paint as protection. Then I glued the letters on it. The letters are from the Alphanumeric Label die set too. I inked the edges with Hickory Smoke and Frayed Burlap Archival inks. Then I put a gold paper underneath which frames the name strip nicely.

The stars are from three different die sets: Crescent Moon, Twig&Stump, Swirling Stars.

The bow-ties from the newly released Tailored die set and coloured them with the same ink combinations that I used for the balloons.

There was one thing that was a real challenge in making this card. What should be the string for the balloons? With the original die you can cut a very short string, the balloons wouldn't have reached over the head of the gentlemen. I was a little afraid that a real twine won't stick perfectly. I was thinking about drawing the strings, but then I thought that a flower stalk might be good.  So I looked through all the flower and leaf dies and I found the perfect, the seven leaved die from the Skeleton Leaves set. I just had to cut off the leaves from the stalk.


What I used:

Sizzix Thinlits die, Gentlemen (666286)

Sizzix Thinlits die, Tailored (666289)

Sizzix Thinlits die, Celebrate Colorize (666285)

Sizzix Thinlits die, Alphanumeric Label (664177)

Sizzix Thinlits die, Skeleton Leaves  (663094)

Sizzix Bigz die, Crescent Moon&Stars (658716)

Sizzix Thinlits die, Swirling Stars (663095)

Sizzix Thinlits die, Twig&Stump (666072)

Idea-Ology, Metallic Kraft Stock

Ranger Distress ink (Tumbled Glass, Salty Ocean, Blueprint Sketch, Twisted Citron, Mowed Lawn, Rustic Wilderness, Weathered Wood)

Ranger Distress Archival ink (Hickory Smoke, Frayed Burlap)

Ranger Distress Spray Stain (Speckled Egg Oxide)

etc.


So if you made a masculine card, please don't hesitate to join our March challenge where a randomly selected winner can have a £20 voucher in the Country View Craft Shop! Good luck!


Tuesday, 1 February 2022

Valentine's Day card with The Park die by Tim Holtz

Hello everyone, I'm here with my first project for our February challenge over at the Country View Challenges, Hearts and Flowers. Be aware that in your project both (flowers and hearts) have to be featured.


To make my card, I took a piece of watercolour paper (300gsm) and stamped the floral background on it. For this, I used embossing ink. Then I sprinkled it with embossing powder (Weathered White) and melted it on with a heat tool. 


Then I blended Distress inks onto the surface. First I added Tumbled Glass (first layer), then Faded Jeans. With this order, the Faded Jeans became lighter than normally.


Then I added Ground Espresso to the edges.

The lady and the gentleman were cut three times from black paper. Usually two layers are enough for me, but this was a thinner paper. I glued grey paper behind the figures to cover the open parts.

The hearts were cut out from the same red paper I used as one of the layers for the card. For this, I used the Falling Heart die.

The text was heat embossed with super fine white embossing powder.

The heart I put in the gentleman's hand is one of the small hearts from the Bigz Heartfelt die set.


What I used:

Sizzix Thinlits die, The Park by Tim Holtz (665204)

Sizzix Thinlits die, Falling Hearts by Tim Holtz (664415)

Sizzix Bigz die, Heartfelt by Tim Holtz (660233)

Stampers Anonymous, Vines&Roses by Tim Holtz (CMS298)

Stampers Anonymous, Tiny Text by Tim Holtz (CMS394)

Ranger Distress inks (Tumbled Glass, Faded Jeans, Ground Espresso)

Ranger embossing powders (Weathered White, Super Fine White)

Ranger Distress embossing ink

etc.


So if you have a project with hearts and flowers, please don't hesitate to join our February challenge where a randomly selected winner can have a £20 voucher in the Country View Crafts online shop.


Wednesday, 8 December 2021

Balck and white card with gentleman by Tim Holtz

This card was made with the gentleman die from the 2021 Tim Holtz Vault Series. So this is smaller than the original Bigz die. As I told you a few posts before, I started to make black and white cards during the weekend. I've already shared with you a card with Santa on his sleigh and here is my second card with this beautifully designed gentleman.


Here the sky was made with Black Soot Distress Oxide ink. The snow was made with thick acrylic paint, tapping the paint onto the surface.

I cut out the lamp and the gentleman from 300 gsm black paper twice, then I glued them together. I also put a layer black acrylic paint on their surface for protection. I cut out a little vellum paper and glued behind the lamp.

The trees were stamped with Black Soot Archival ink. The text was stamped with embossing ink and heat embossed with black super fine embossing powder by Ranger.

I spattered the whole surface with white acrylic paint diluted with water.


What I used:

Stampers Anonymous, Tree Line (CMS244) by Tim Holtz

Stampers Anonymous, Holiday Drawings (CMS284) by Tim Holtz

Sizzix Thinlits die, Christmas, 2021 Vault Series (665584)

Ranger embossing powder (super fine black)

Ranger Distress Oxide ink (Black Soot)

Ranger Distress Archival ink (Black Soot)

etc.


I hope you like it! Thank you for stopping by!


Friday, 1 November 2019

Masculine Christmas tag with gentlemen

Hello everyone, here I am with a tag that I made for the November challenge of the Country View Challenges. The lovely CraftyField will be your hostess, so she chose the theme: Hand stamped. It means a stamped image has to be the focal point of your project and you mustn't use digital stamping.

So I made a masculine Christmas tag.


And here is my background tutorial.

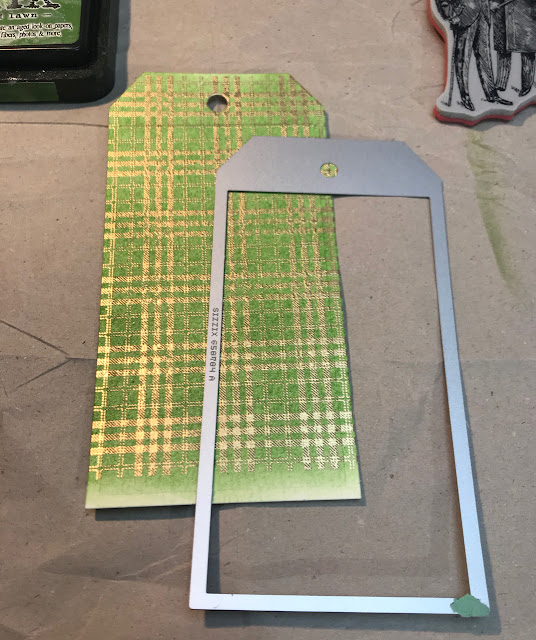
I stamped onto a 300gsm watercolour paper with one of the background stamps from the Perfect Plaids stamp set. I heat embossed with Ranger Princess Gold embossing powder. Then I started to ink with different greens (Mowed Lawns, Shabby Shutters).


Then I cut out a tag with the largest die of the Sizzix Framelits die set, Tag Collection.


Since the tag was larger than the stamped background I put extra inking to the bottom and the top. Then I inked the edges of the tag with Vintage Photo.


Then I was about to hide the lack of stamping on the bottom, so I added design tape stripes.


In the end, I glued my tag onto a few millimetres bigger brown tag. I distressed the edges of the brown tag, then I spattered my tag using Vintage Photo Spray Stain.


Then I adhered the stamped image, the die-cut text and the embellishments to the tag.

What I used:

Stampers Anonymous, Perfect Plaids by Tim Holtz (CMS383)

Stampers Anonymous, Yuletide by Tim Holtz (CMS356)

Sizzix Thinlits die, Home For The Holidays by Tim Holtz

Sizzix Framelits die, Tag Collection by Tim Holtz

Idea-Ology, Mirrored Stars

Idea-Ology, Loop Pins

Idea-Ology, Design Tape (Travel)

Ranger Distress ink pads (Vintage Photo, Mowed Lawn, Shabby Shutters)

Ranger embossing powder (Princess Gold)

Ranger Distress Spray Stain (Vintage Photo)

etc.


If you have a project with stamping, please don't hesitate to join our November challenge where you can win a £20 voucher!