Showing posts with label man. Show all posts

Thursday, 10 August 2023

Birthday card with one of the Gentlemen

I made this card for my mother-in-law's 80th birthday. Her birthday will be just in October but I like to be prepared in time.


For the background I took a watercolour panel and I inked the surface with Tumbled Glass and Speckled Egg Distress Oxide inks. Then I blended Faded Jeans ink through the Linked Circles stencil. Then I inked the edges with Chipped Sapphire ink.


To give a protection to my panel, I dabbed Distress Collage Medium to the surface.


The bird and the gentlemen was cut out from black paper twice and then glued them together. The numbers and the balloon was cut out from white watercolour paper and coloured with Distress inks (Squeezed Lemonade, Mustard Seed, Fossilized Amber). The text was stamped with embossing ink on black cardstock, then I heat embossed with white embossing powder.


What I used:

Sizzix Thinlits die, Gentlemen (666286)

Sizzix Thinlits die, Alphanumeric Bulletin (666281)

Sizzix Thinlits die, Cozy Winter (665574)

Sizzix Thinlits die, Celebrate (666285)

Stampers Anonymous, Crazy Talk (CMS236)

Stampers Anonymous, Linked Circles (THS159)

Ranger Distress inks 

Ranger Distress Oxide inks

Ranger Distress Collage Medium

Ranger Distress embossing powder (super fine white)

etc.


With my card, I would like to join the Simon Says Stamp Monday Challenge: Happy Birthday


Friday, 16 June 2023

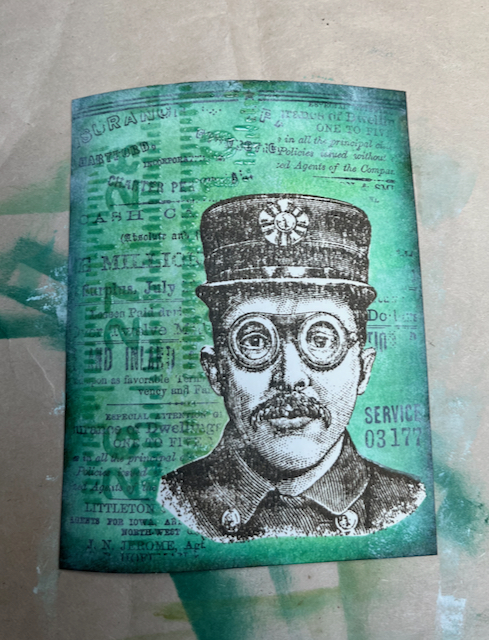
Masculine card with Inspector by Tim Holtz

Hello everyone! Lately I received a package with everything I ordered, including Tim's Rotary Media Trimmer, inks, embossing folders, Idea-Ology stuff and The Inspector stamp set.

So here is my first attempt with The Inspector.


And here is the tutorial.

I stamped the inspector with Vintage Photo and Black Soot Archival ink on a watercolour panel.


Then I covered the image with a mask paper.


I coloured the panel with Salvaged Patina, Peeled Paint and Pine Needle. Then I stamped around the inspector with Black Soot Archival ink using the Professor 2, The Inspector stamp sets.


Then I inked the edges with Ground Espresso.


Then I toned back the bold colours with diluted white paint.


Then I stencilled the panel using the Measured stencil and Ranger Transparent Matte texture paste. Then I sprinkled the embossed part with a mixture of Salvaged Patina and Speckled Egg embossing glaze. When the embossing paste was dry, I melted the embossing glaze on the top of the embossed surface with a heat tool.


Then I removed the masking sheet.


Then I coloured the image with Distress markers.


Then I wanted to add something else, so I put some gears to the edges. I coloured the gears with brown paint.

What I used:

Stampers Anonymous, The Professor 2 stamp set (CMS395)

Stampers Anonymous, The Inspector  stamp set (CMS465)

Stampers Anonymous, Measured layering stencil (THS012)

Sizzix Thinlits die, Gearhead (661184)


With this card, I would like to join the Simon Says Stamp Monday Challenge: Masculine


Saturday, 5 October 2019

Umbrella man with black and white bokeh background

I made this card as a second inspirational project for our October challenge, called Bokeh. And this month the lovely Sue will be your hostess. 

This time I chose an old but one of my favourite Bigz dies, the Umbrella Man. And I created a black and white bokeh background for him.


And now I show you how I made this bokeh background. 

I took a 300gsm watercolour paper and inked with Hickory Smoke and Black Soot Distress inks. Then, to fix these colours I blended Watering Can and Jet Black Archival ink, but you can use Tim's Archival inks because the Black Soot and the Hickory smoke exist in Archival ink as well.


Then I used a handmade stencil (I cut out circles into a plastic sheet) and sponged Picket Fence ink through the circles.


I smeared more ink through the smaller circles to achieve a nice bokeh effect.


I sprayed my background with a fixative, then I cut out the Umbrella Man from black cardstock and adhered to the card. I also added a text from Tim's sticker book.


So if you like the bokeh technique, please join our October challenge where you can win a £20 voucher of the Country View Challenges. 


Friday, 4 December 2015

Vintage Christmas card with Festive Gent by Tim Holtz

When I was ready with this card, I realised that in Blogland there are two challenges which fit to my card. 


So with this Christmas card I would like to enter:

1. Monday Challenge of Simon Says Stamp blog - Gentlemen

2. A Vintage Journey blog - Vintage Christmas


What I used:


Ranger Distress Embossing Powder (Princess Gold)

Ranger Distress ink pads (Walnut Stain, Mowed Lawn)

Ranger Distress embossing ink pad

red felt - for the scarf

red rhinestones

Docrafts Papermania: Christmas in the country - for the background

First Edition paper: Christmas Wishes - for the package

black, green cardstock, ivory card


Sunday, 7 June 2015

Sizzix - A happy birthday masculine card with hat and moustache


With this card I join a challenge on Simon Says Stamp blog: Make it masculine!


This will be the birthday card of my hubby :-)


To make this card I combined  two Sizzix step-up cards by Stephanie Barnard. 

First I cut out the basic with Sizzix Happy Birthday Step-Up Framelits Die:


I used the other side of the printed cardstock to cut out the "happy birthday" saying.


I used another cardstock to cut out the hat twice with Sizzix Top Hats and Moustaches Thinlits Die by Jen Long (659063). After I cut out the hat from a simple brown cardstock and with scissors I cut out a piece for the band. 


I cut out the moustache twice from a plain black cardstock.


I used a very thin but strong wire and I placed and glued it to the middle of the hat and the moustache. 


What I also used:


Sizzix Framelits Die, Basic by Stephanie Barnard (660023)


Basic Crate Paper double sided cardstock (680170)

Authentique Paper, double sided cardstock, Natural Collection "Beaming"

Ranger Distress Ink Pads (tea dye, scattered straw, frayed burlap) - for the edges of the elements

Pritt Stift Stick, 3D adhesive, Aleene's Tacky Glue (fast grab)

wire