Showing posts with label snow globe. Show all posts

Sunday, 22 December 2019

Christmas card - town scene in a bell jar

The thing is that I have projects to show but I have no time to blog about them. Right now I have found some time to write a short tutorial of this card.


The basic if this card is a black folded card because the black looks great with the red. 

The second layer is red cardstock and I stamped one of the background stamps from the Stripes&Holiday stamp set (Stampers Anonymous/Tim Holtz). For this, I used the Ranger Archival Jet Black ink.

I inked the edges with Walnut Stain Distress ink.

For the Christmas town scene, first of all, I used the Sizzix Bigz, Bell Jar die. The top was cut out from 300gsm watercolour paper. The bottom from kraft paper. The bottom was inked with Vintage Photo Distress ink.

The upper part of the top was inked with Stormy Sky Distress ink. Then I cut out the elements of my scene from Core'dinations Kraft Core papers. 

For the scene, I used: Sizzix Thinlits Snowglobe, Tiny Snowglobes and Festive Things dies.

For the big stars, I used the Sizzix Bigz, Crescent Moon die.

For the little stars, I used the Sizzix Thinlits, Snowglobe die.

All the stars were cut out from Metallic Kraft paper by Tim Holtz.


I hope you like it!!! Thank you for stopping by!!!

With my card, I would like to join the following challenges:

Simon Says Stamp  Monday Challenge: Cityscape 

A Vintage Journey: Holly Jolly Christmas


Thursday, 19 December 2019

Christmas card with an elf

This cute little elf is so busy to put the toys and presents on the shelves in Santa's Workshop. But unfortunately, he is so little and he can't reach the top shelf. He decided to step on a Christmas gift box to be able to place the snowglobe on the top shelf.


For this card, I used my earlier card, my card with snowglobes as an inspiration.

Here is a closer picture of the tiny snowglobe without the dome:


What I used:

Sizzix Thinlits die, Santa's Helper (664192)

Sizzix Thinlits die, Mini Christmas Things (662418)

Sizzix Thonlits die, Tiny Snowglobes (663119)

Sizzix Thinlits die, Village Christmastime (662424)

Idea-Ology, Dapper Paper Stash 12x12 

Core'dinations Kraft Core cardstock

Sizzix Dimensional Domes 

Kraft papers

Ranger Distress paints (Broken China, Picket Fence) - I used these for the background of the tiny snowglobe 

Idea-Ology Seasonal Sticker Book


With my card, I would like to join the challenge of A Vintage Journey: Holly Jolly Christmas

I hope you like it!!! Thank you for stopping by!!!


Tuesday, 29 October 2019

Card with tiny snow globes by Tim Holtz

You are in the right place if you wanted to visit Santa's Workshop. Let's start in the Snow Globe Department!


For this card, I used the Sizzix Tiny Snowglobes by Tim Holtz and of course, other dies. And if you like my card and if you have time, here is the part for a long tutorial.  

My idea was to use as many images from Tim's Snowglobes die set as I can. Here you can see an earlier card where I also made a snowglobe with Santa. 

So creating a snow globe department seemed a good idea for putting a lot of snow globes on my card. 

First I cut out 6 snowglobes (bases plus circles). For the bases, I used kraft cardstock and for the circles, I used watercolour paper. 

And I also cut out the shelves using the Sizzix Laboratory Thinlits die set by Tim Holtz. These were cut out from kraft cardstock as well.


Then I started to cut out the little elements and assemble them. For this, I usually used coloured cardstock, except the Santa, he was hand-painted.

I painted Santa's face with DecoArt Light Buttermilk and the suit with DacoArt Santa Red paint. Then I glued the beard and the fur trimming which were cut out from white watercolour paper. 


Then I painted black the boots and glued the other trimmings and the pompom. His nose was coloured with Tattered Rose Distress marker.


With a black marker, I put two little dots for making eyes for Santa.

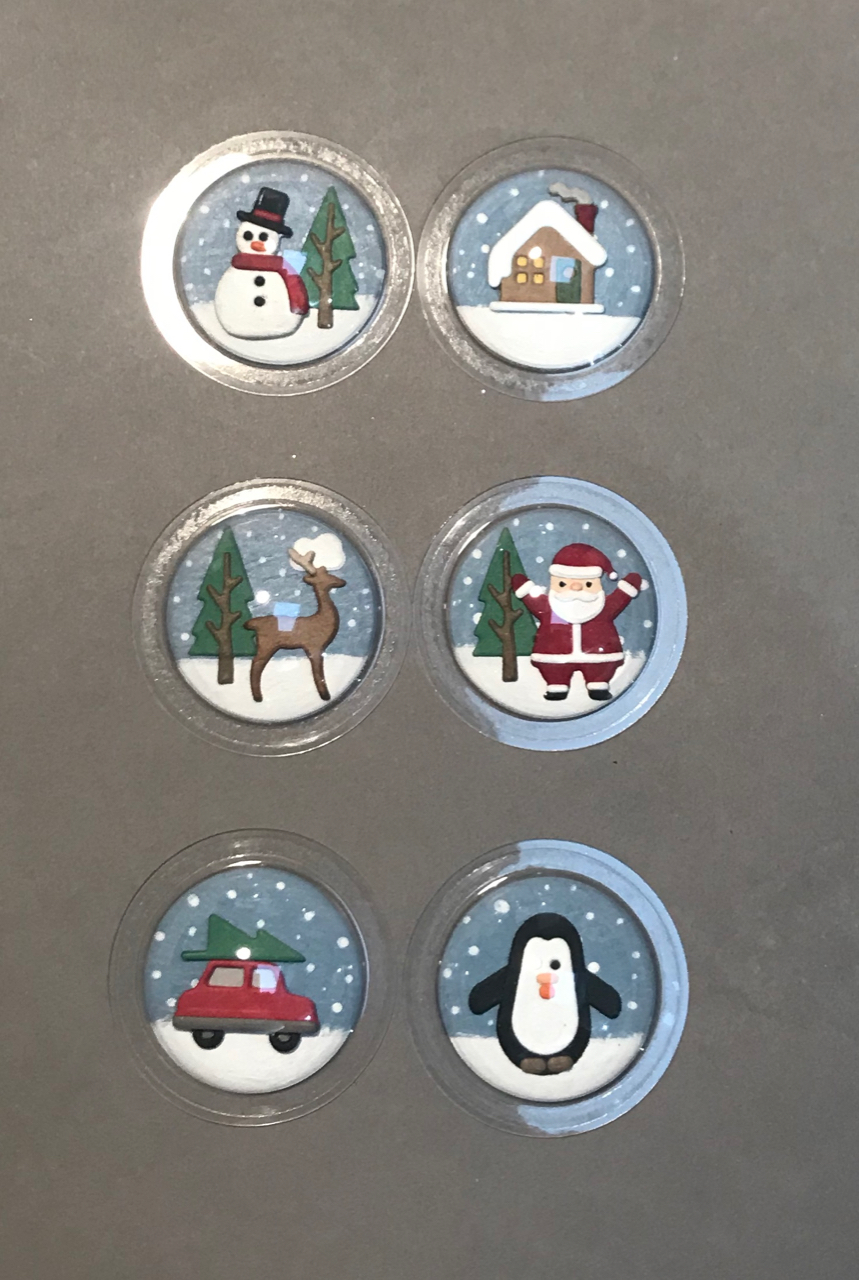
Here you can see how I filled the tiny snowglobes with the cutouts.


Then I started to paint the backgrounds. For the sky part, I used Stormy Sky Distress paint. For the snowy part, I used Picket Fence Distress paint. Then I added tiny dots with a fine brush for creating snow.


Then I adhered the tiny elements onto the painted circles.


Now here comes the tricky part when I had to be very precise. First of all, I found the perfect background paper (Idea-Ology Dapper 12x12), then I measured where to put the shelves and the snowglobes. After this, I started to cut out the circles.


When I was ready with all the circles, I drew the outlines of the circles on a 300 gsm grey cardstock.


Then I adhered my little snowglobes onto the grey cardstock, placing them into the drawn lines. After this, I placed the Sizzix Dimensional Domes over the circles.


At this part, I have to tell you that I wanted to put glitter into my snowglobes. I poured glitter powder in the middle of the circle but the glitters just stuck onto the surface of the dome and everything was blurry and I hardly saw my lovely scene. So I got rid of the glitter and adhered the domes without any glitter.


The next step was to glue the background paper on the grey cardstock and to cut out the text with Sizzix Alphanumeric Label Thinlits dies.

I inked the edges of the striped paper with Gathered Twigs Distress inks, then I smeared Picket Fence and then I inked with Antique Linen Distress ink.


I took the Village Christmastime Thinlits die set and decorated the shelves with them. I put Mini Fasteners into the holes of the shelves.

To the bottom, I adhered the Special Delivery paper from the Christmas Ephemera pack. And I also added four stars from the Mirrored Stars Idea-Ology pack.

Then I placed my card to a white card base. And that's it! But actually, I have to admit, it was a big job :-)


Here are some close-ups:


I hope you like it!!! Happy crafting!!!

With my card, I would like to join the challenge of the Funkie Junkie Boutique: It looks real - since my snowglobes look like real tiny snowglobes with real glass. 


Sunday, 14 October 2018

Christmas card with snowglobe by Tim Holtz

Hello everyone, here I am again with a Christmas card. For this card, I used the Sizzix Snowglobe die #2 by Tim Holtz. 


For the background paper, I used the small dots background stamp from the Stampers Anonymous, Dots&Floral stamp set (CMS220). I stamped the dots with Ranger Archival Vermillion ink. Then I aged the paper with diluted Ranger Distress Antique Linen ink.

For the background of the snowglobe, I applied diluted Ranger Distress Weathered Wood and Stormy Sky inks and tapped onto the surface with a sponge.


What I used:

Sizzix Thinlits die, Snowglobe #2 by Tim Holtz

Stampers Anonymous, Dots&Floral by Tim Holtz (CMS220)

Ranger Archival ink pad (Vermillion)

Ranger Distress ink pads (Stormy Sky, Weathered Wood, Antique Linen, Gathered Twigs)

Idea-Ology, Small Talk Sticker Book, Occasions

white acrylic paint

kraft paper

Tim Holtz Kraft-Core card stocks 

etc.


I hope you like it!!! Thanks for stopping by!!!


With my card, I would like to join the Simon Says Stamp Monday Challenge: Cityscape


Saturday, 12 August 2017

Card with Tim Holtz Snowglobe

After a one month holiday I'm back. I left the 40 degree for the 14! None of them is average in summer but if a season called summer I prefer the 40 - my mum doesn't agree with me.

So after my long break I would like to show you a totally Tim Holtz card. I have mixed three different thinlits die sets by Tim, the Suburbia, the Commute and the Snowglobe


The elements were cut out from Kraft-Core Nostalgic and Classic Collection.

The big part of the snowglobe was cut out from watercolour paper (300g/140lb). I smeared Tumbled Glass, Stormy Sky and Hickory Smoke inks onto the paper and after I spritzed with water.

The text is from one of Tim's text book (sticker book).


I hope you like it! Big hugs


Thursday, 30 March 2017

Easter card with Tim Holtz Snowglobe die - pink and yellow

Earlier this month I showed you an Easter card which was made with Tim Holtz Snowglobe die but I didn't give you tutorial about how I made it. 

Now at the Country View Crafts I give you a full tutorial with plenty of photos. 

So if you want to know how I put together these cards, please hop on the CVC blog!


I hope you like it! Happy crafting!


Sunday, 26 March 2017

Easter card with Tim Holtz Snowglobe die

Hello Everybody! Again I have finished an Easter card with using Tim Holtz Snowglobe die.


What I used:

Sizzix Framelits Die, Rectangle


Ranger Distress ink, Vintage Photo

Ranger Distress paint, Picket Fence

etc.


With my card I would like to join the following challenges

A Vintage Journey: All aboard!

Simon Says Stamp Monday Challenge: Layer it up!

Simon Says Stamp Wednesday Challenge: Use more than one die or punch!


Thursday, 16 February 2017

Tim Holtz Snowglobe - Home

Hello All, 

Today I've started to blog over at the Country View Crafts blog too. So there my first project is a snowglobe card. On the Country View Crafts blog you can find my tutorial, but here I will tell you the story of this card.

I have a friend who had a name-day lately and who loved my townscape card with angel. For her name-day she asked me to make a Tim Holtz Brownstone house from white cardstock but with grey roof and windows. So in this card I mixed the two things she liked: the townscape and the white house.


I wanted to make contrast, the white-grey house amongst the very colourful houses.


Thank you for visiting and have a nice day!

With my card I would like to enter the Monday Challenge of the Simon Says Stamp blog: Use your favorite tool - as my favourite tools are the Sizzix Big Shot Plus Machine and the Tim Holtz dies :-)


Monday, 23 November 2015

DIY snow globe from a jar - Santa with his bag

Yesterday I showed you my jar snow globe with a tutorial. So for today I just brought you the pictures of the new version.

If you want to see the tutorial, please click here.


Have a nice week!


Sunday, 22 November 2015

DIY jar snow globe - Santa on the sleigh and trees

Oh, it's so hard to take pictures about something behind a glass! But I hope you can see my cute Christmas scene - Santa on his sleigh.


If you like it, I will show you how to make this low budget snow globe by yourself.


1. Take a clean jar.


2. Sand a little bit the lid (because - I think - the paint will adhere much better)


3. Paint the lid with silver paint in three layers. (After every layer wait until it dries.)


4. Buy not too expensive model trees and figures. My Santa was about 2,50 EUR. And place them to the lid - this is just a try to see how it will looks like.


5. With hot glue fix the trees. After put modelling paste into the lid around the trees.


6. Scatter fake snow on the modelling paste and tap it into the modelling paste.


7. Wait until it will be completely dry. Then fix the Santa with hot glue. Scatter some more fake snowflake.


8. Tie a bakers' twine around the lid and put some bells too.