Showing posts with label steampunk. Show all posts

Wednesday, 22 December 2021

Cards - Steampunk Christmas trees

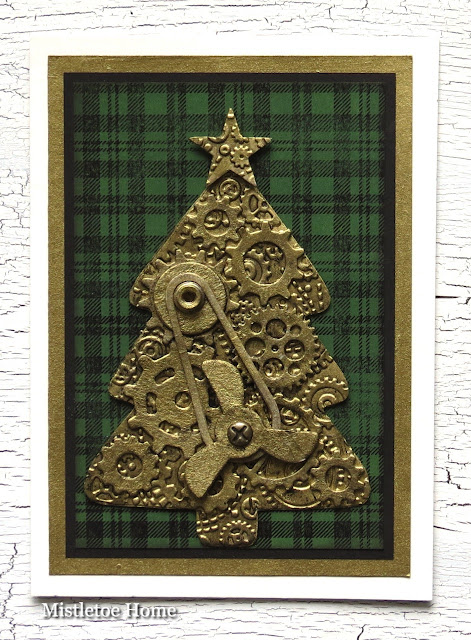
You may know that I already had a blogpost with steampunk Christmas trees, but since all three greeting cards found a new owner, I decided to make three more. The only change is that the background colours are different to the previous three.

In that previous blogpost you will also find the step-by-step tutorial about how to make the trees and backgrounds. 

So here you can have the photos only.

First the green one, with Mowed Lawn Distress paint.


The next background was made with a Decoart paint, Purple Cow.


The last background, however, was not made with paint but with ink, Salvaged Patina Distress Oxide.


And here come the close-up photos.


I hope you like these too. Thank you for stopping by!


Monday, 6 December 2021

Card with steampunk Christmas tree

Hello everyone, today I would like to show you my card trio with steampunk Christmas tree. After one of my friends saw my steampunk canvas here on my blog, she asked me to make her a card with the same steampunk tree because she wants to surprise someone with it. 

I said yes, although the canvas with the steampunk tree took a lot of time to make. So I decided that if I'm going to do a big job again, I'd better make it three :-)

From the three Christmas cards, she chose the one with the red backgrounds.


In the steampunk canvas post you will find the tutorial for making a Christmas tree with gears. But there are some differences, so I will try to write them down.

I scaled down the original Christmas tree and drew it on a 300 gsm paper. That was the base.


Then I traced the outline of the tree on a 200 gsm paper. This became the tree that I embossed.


I painted gold the 200 gsm paper and when it was completely dry, I embossed it.


Then I cut out different sizes of gears and tried to arrange them on the tree. I painted the gears gold and when I was satisfied with the design, I started to glue the cogs on the embossed tree.

If I remember correctly, I aged the Christmas tree on the canvas with brown paint but here, I did it with diluted black paint.


Here you can see what it looked like before and after.


As for the background. I cut three rectangle panels. The first was painted with Candied Apple but since I found the colour too light, I blended Aged Mahogany ink onto the surface when the paint was dry.


The second was painted with Rustic Wilderness, that was perfect so I didn't add anything else.


Here is the card with this background.


The third one was painted with Prized Ribbon and since I found this too light too, I blended Faded Jeans ink onto the surface. 


The next step was to stamp the coloured panels with the Plaid background stamp. For this, I used Jet Black Archival ink since I don't have the big version of the Black Soot Archival ink.


I cut around the stamped part, then inked the edges with Ground Espresso ink.


I placed and glued this stamped panel on a few millimetres larger black panel. 


Here is the blue card:


What I used:


Stampers Anonymous, Plaid&Nordic stamp set (CMS243)


Sizzix Bigz L die, Industrial by Tim Holtz (661817)


Sizzix Bigz L die, Mechanical by Tim Holtz (665225)


Sizzix Bigz die, Gadget Gears 2 by Tim Holtz (661193)


Sizzix Bigz die, Crescent Moon&Stars by Tim Holtz (658716)


Sizzix Thinlits die, Gearhead by Tim Holtz (661184)


Sizzix Texture Fades, Blueprint&Gears set by Tim Holtz (658580)


Ranger Distress paint (Rustic Wilderness, Candied Apple, Prized Ribbon)


Ranger Distress inks (Aged Mahogany, Faded Jeans)


Ranger Archival inks (Jet Black, Black Soot, Ground Espresso)


Schmincke Acryl Bronze paint (Rich Gold)


Wednesday, 1 December 2021

Steampunk Christmas tree canvas with gears by Tim Holtz

Hello everyone, December is here, so we've come to the last challenge of the year on the Country View Challenges blog. The theme this time is simple, Christmas

Let me show you my first project, a steampunk Christmas tree on canvas. 


This is not my first steampunk creation, I've already made birds, hares and a horse with gears and cogs. 

To make this project, I looked for a tree template on internet, enlarge it to a size that would look good on the canvas then I cut it out.

I then traced it twice on a thicker paper and cut them out.   

I glued the two trees together, so I had a thicker base tree. Then I painted it gold with a Schmincke paint (Rich Gold).

Then I made another tree from a 200 gsm paper and I painted this gold too.

Then I embossed this thinner tree with an old embossing folder, Gears by Tim Holtz. And I glued this on the top of the thick tree base.

Then I cut out many gears with Tim's Bigz dies from chipboard and I started to add them on the tree. I also cut out gears with the Thinlits Gearhead die set but in this case I cut each gear three times from 300 gsm paper then I glued them together.


The star was made the same way as the tree. I cut out a thicker base and another from lighter paper. The lighter was embossed and glued on the top of the base.

And now for the canvas. I took a primed canvas and glued a tissue paper on it, making small and large creases as I went. For this, I used decoupage glue and a brush.

When it was completely dry, I painted it with Rustic Wilderness Distress paint. For this, I just used a piece of kitchen sponge and I tapped the paint onto the surface.

Since Christmas tree was gold, it seemed like a good idea to give the background the pine colour.


What I used:

Sizzix Bigz L die, Industrial by Tim Holtz (661817)

Sizzix Bigz L die, Mechanical by Tim Holtz (665225)

Sizzix Bigz die, Gadget Gears by Tim Holtz (656636)

Sizzix Bigz die, Gadget Gears 2 by Tim Holtz (661193)

Sizzix Bigz die, Crescent Moon&Stars by Tim Holtz (658716)

Sizzix Thinlits die, Gearhead by Tim Holtz (661184)

Sizzix Texture Fades, Blueprint&Gears set by Tim Holtz (658580)

Ranger Distress paint (Rustic Wilderness)

Schmincke Acryl Bronze paint (Rich Gold)

etc.

So if you have a Christmas project please don't hesitate to join our December challenge where a randomly selected winner can have a £20 voucher in the Country View Crafts online shop.

With this project I would like to join the:

Simon Says Stamp Monday Challenge: Sparkle Mode

The Funkie Junkie Boutique Blog: Yuletide Delights


Sunday, 10 May 2020

Birthday card with a steampunk horse

As you can see, on my card Winifred, the zebra turned into a steampunk horse. Lately, I made many projects with steampunk animals (birds, rabbits) and I wanted to try it with another creature, so I chose Winifred to make a horse.


For making the background, I took a 300gsm watercolour paper and blended the Weathered Wood ink onto the surface. Then I chose the Circuit stencil and inked through the stencil with Black Soot Archival ink. 


After this, I blended Tumbled Glass Distress Oxide ink onto the whole surface. Then I spritzed with water. In the end, I splattered with diluted Brushed Pewter paint. The edges were inked with Black Soot Distress ink.


For the horse, I didn't use all the elements of Winifred. But some of her parts were embossed with the Riveted Metal texture fades. I also added some gears from the Gearhead Thinlits die set.


What I used:

Sizzix Thinlits die, Alphanumeric Classic Lower by Tim Holtz

Sizzix Thinlits die, Wildflower Stems by Tim Holtz

Sizzix Thinlits die, Colorize, Winifred by Tim Holtz

Sizzix Thinlits die, Robotic by Tim Holtz

Sizzix Thinlits die, Gearhead by Tim Holtz

Sizzix Texture Fades, Diamond Plate&Riveted Metal by Tim Holtz

Sizzix 3D Impresslits, Star Trim by Tim Holtz

Stampers Anonymous, Circuit layering stencil by Tim Holtz

Ranger Distress inks, paints


With my card, I would like to join the Simon Says Stamp Monday Challenge: Spritz and Splatter


Tuesday, 21 April 2020

Metal steampunk bird - canvas

I don't know but you might remember my canvas with a gold steampunk bird (if not, click here to see) but today would like to show you its pair, the masculine version.


I made this for the April challenge of the Country View Challenges where the theme is: Animal magic. Your hostess is the lovely Corrie this time and she wants to see an animal (real or fantasy) as a focal point of your project.

This is a 13x19 cms canvas which was covered with crumpled tissue paper. Then I painted the whole surface with Faded Jeans Distress paint. I inked the edges with Vintage Photo and Black Soot Archival inks and I also spritzed with a little wet Black Soot paint.

What I used:

Sizzix Bigz die, Bird Silhouette by Tim Holtz

Sizzix Bigz die, Industrial by Tim Holtz

Sizzix Thinlits die, Gearheads by Tim Holtz

Sizzix Thinlits die, Robotic by Tim Holtz

Sizzix Thinlits die, Funky Florals 1 by Tim Holtz

Sizzix Thinlits die, Wildflower Stems by Tim Holtz

Sizzix Texture  Fades, Diamond&Riveted Metal by Tim Holtz

Ranger Distress paints (Faded Jeans, Black Soot, Brushed Pewter)

Ranger Distress Archival inks (Black Soot, Vintage Photo)


If you have a project with a real or a fantasy animal (or two or more), please don't hesitate to join our challenge where you can win a £20 voucher!


Thursday, 9 April 2020

Gold steampunk bird

Hello dear crafters, let me show you my latest creation, a canvas with a golden steampunk bird. For this canvas, I got the inspiration from my Easter tags with steampunk rabbits. (You can see the silver one here and the gold one here.) I really liked how they turned out so I wanted to make another machinelike animal, so I chose a bird silhouette (Sizzix, Tim Holtz).


I like to use rich colours and I think the gold is perfect with turquoise. I also like the surface of my canvas. I achieved this texture with crumpling and glueing tissue paper on.

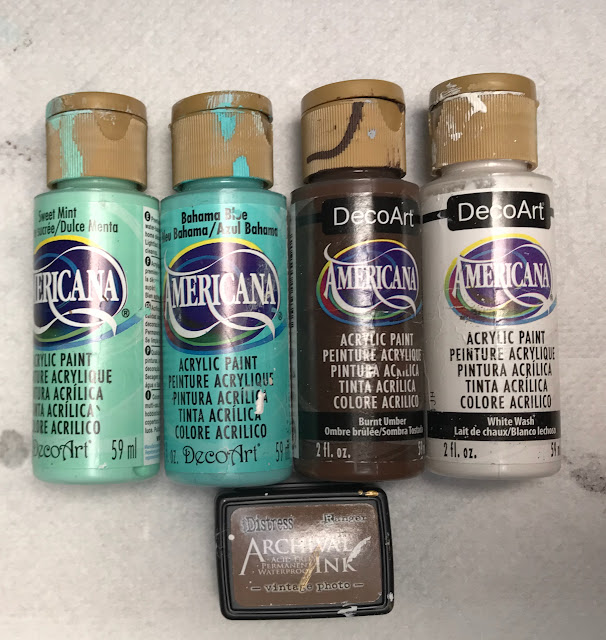
Here are the colours of my canvas:


With attaching the wing with a brad it can actually move. So it’s an interactive gold steampunk bird. 


This is a quite small canvas, the size is 13x19 cms.


With my canvas, I would like to join the Simon Says Stamp Monday Challenge: Add some texture


Thursday, 26 March 2020

Gold and turquoise steampunk Easter tag

When I finished yesterday my blue and silver steampunk Easter tag, I couldn't stop and started to make another one with another colour combo, the gold and the turquoise. I really liked my yesterday tag and I was really satisfied with the result but I have to tell you that I just loooove this one. 


The tag was cut out from chipboard and I put a layer of white gesso on both sides. When it was dry, I painted the tag with a mixture of Cracked Pistachio and Tumbled Glass.


The edges were inked and smudged with Ground Espresso and Black Soot Archival inks, Walnut Stain and Vintage Photo Distress Crayons and gold acrylic paint.


The rabbit was cut out from chipboard then I glued the gears on the surface. When I was ready with this, I painted the whole rabbit with Walnut Stain Distress paint. In the end, I spritzed the tag with Walnut Stain paint with a fine brush.


Then the gold paint was next. At this point, I realised that the gold went everywhere even to the wholes and dents. So when it was totally dry, I again put a layer of Walnut Stain on the surface, then quickly I started to wipe it off.


The text was heat embossed with Ranger Potting Soil embossing powder.

What I used:

Sizzix Bigz die, Cottontail by Tim Holtz

Sizzix Bigz die, Tag&Bookplates by Tim Holtz

Sizzix Thinlits die, Funky Florals 1 by Tim Holtz

Sizzix Thinlits die, Funky Florals 2 by Tim Holtz

Sizzix Thinlits die, Gearhead by Tim Holtz

Sizzix Thinlits die, Robotic by Tim Holtz

Stampers Anonymous, Spring Shadows by Tim Holtz (CMS393)

Ranger Distress paint (Cracked Pistachio, Tumbled Glass, Walnut Stain)

Ranger embossing powders (Potting Soil)

Ranger Distress inks, crayons

Ranger Distress Archival ink (Ground Espresso, Black Soot)


With my tag, I would like to join the:
Simon Says Stamp Monday Challenge: Steampunk
Simon Says Stamp Wednesday Challenge: Anything goes
A Vintage Journey: Celebration Time Come On!

And here's a collage of both tags: