Showing posts with label shabby chic. Show all posts

Thursday, 27 October 2016

Alteration of a MOPPE mini chest of drawers by IKEA

I have bought a MOPPE mini chest with 4 drawers but I wanted to transform it into a shabby chic furniture.


The original MOPPE chest looks like this:


So to make it shabby chic I made the following steps.

1. I sanded the whole chest.

2. I painted dark brown.

3. I glued Tim Holtz tattered flowers to the middle of the drawers.

4. I painted the flowers brown too.
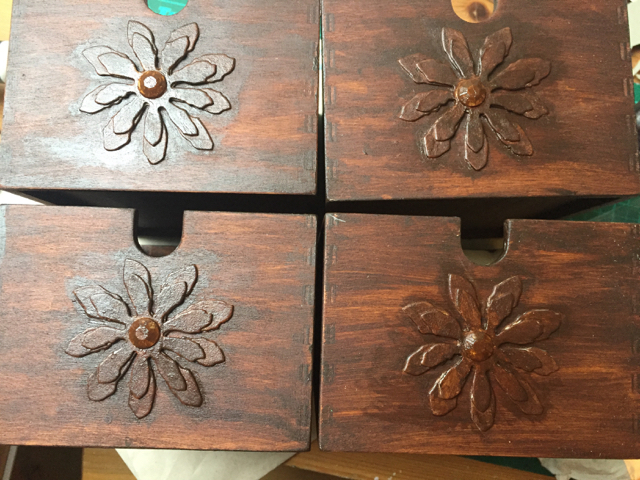


5. I put a little vaseline to the edges and to other parts.

6. I put two coats of DecoArt Americana Chalky Finish paint (Refreshing).

7. I painted the flowers white with DecoArt Americana Chalky Finish (Everlasting).

8. I wiped off the paint from the edges and the other creamed  parts.

9. I sanded the edges of the flowers.


10. And now it's time to fill it with my little objects :-)


Don't forget my giveaway! You still have time to win a Tim Holtz stamp set!


Tuesday, 21 June 2016

Shabby chic card with flowers

I have to tell you that nowadays I have seen two cards which impressed me a lot. The first was made recently by Brenda who had a shabby chic beauty and the other was made by Pamellia. I love both cards and I envied these lovely ladies for their fabulous cards and I decided to make my version.

Thank you ladies for the inspiration! 


What I used:


And I know exactly who will receive this card next week :-)


With this card I would like to enter the following challenges:

Monday Challenge of the Simon Says Stamp blog - Use Patterned Papers

A Vintage Journey - Texture or Embossing Paste

Frilly and Funkie - Pastels and Pearls

The Craft Stamper Magazine - Let's Get Inky!

The Mixed Media Monthly Challenge - "2nd Anniversary" - Dimension


Sunday, 14 June 2015

Shabby chic mixed media canvas - a lady and a gentleman

Our wedding anniversary will be on July 7th. This happy occasion inspired me to make this mixed media canvas.

In winter I had seen at Anette Green Tim Holtz's Festive Gent holding a heart in his hand instead of wreath. This gave me the idea to use this gent for my celebration canvas. 

My other favourite is the Lady from the Victorian Carolers what I used so many times.


For making this canvas I took a 18x24 cm (7x9") stretched and primed canvas and I put one layer of gesso on it.


After I cut out the main elements, the gent and the lady.


I cut out the heart with Tim's Love Struck die but I had to cut it smaller with scissors.


I put some torn book paper and music sheet on the canvas and I glued them with gesso on the canvas.


With Tim's stencil I put bubbles into two corners.


Then I stamped nice sentiments with Tim's saying stamps and a StazOn ink pad.


I used a new chalk acrylic paint but I wasn't very happy with this :-( Anyway, I put some greyish green on the left corner, green in the middle and I tried to put a soft pink on the lower right corner. And some brown to the edges. I used sponge to put the paint on the canvas.


When it was dry I put Tim Crackle Paint on some parts.


And of course, I added my favourite lace from Tim.


I painted white the figures, I waited to dry and I put some Tea Dye ink to the edges.


I cut out the branches and flowers from white paper and I added Tea Dye to the edges.

I arranged the elements and after I started to glue them on.


You can see fine crackles on the figures and on the canvas too.


With this canvas I'd like to enter to:

The "Celebrations" Challenge of A Vintage Journey

The "Shabby chic" Challenge of Country View Challenges


What I used:


Tuesday, 19 May 2015

Sizzix - shabby chic treasure box with laces

I have made this box for Eszter and I already know what she will keep in it. 


For making this box I used a retired Sizzix XL Bigz die:


I cut out the box from chipboard. I had to strengthen the folding lines with sellotape because the chipboard could easily tear at the folding lines.


I got some real music sheets from my mother-in-law for creative use and creative purposes.


I coloured the music sheets with Ranger Distress inks (Spun Sugar, Victorian Velvet).


After I covered the box with the music sheets inside and outside as well. For this I used decoupage glue (Mod Podge) what I put under and on the music sheet.


I sanded the edges with a sandpaper.


To the edges and some parts I smeared some gesso, then I put a layer of acrylic medium.


When the acrylic medium was dry I put all the embellishments on the box (the laces, the leaves, the roses...)


What I used:


Sizzix Bigz XL Die, Box (656278)


Ranger Distress ink

music sheet

chipboard

acrylic paints, gesso

glue

acrylic medium