Hello everyone, today I would like to show you my card trio with steampunk Christmas tree. After one of my friends saw my steampunk canvas here on my blog, she asked me to make her a card with the same steampunk tree because she wants to surprise someone with it.
I said yes, although the canvas with the steampunk tree took a lot of time to make. So I decided that if I'm going to do a big job again, I'd better make it three :-)
From the three Christmas cards, she chose the one with the red backgrounds.

I scaled down the original Christmas tree and drew it on a 300 gsm paper. That was the base.

Then I traced the outline of the tree on a 200 gsm paper. This became the tree that I embossed.


Then I cut out different sizes of gears and tried to arrange them on the tree. I painted the gears gold and when I was satisfied with the design, I started to glue the cogs on the embossed tree.
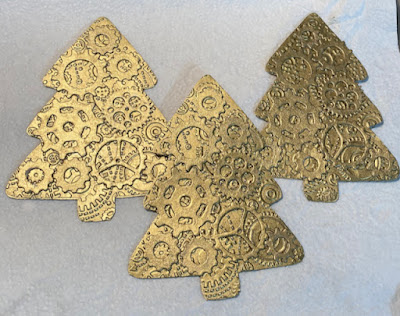
If I remember correctly, I aged the Christmas tree on the canvas with brown paint but here, I did it with diluted black paint.

Here you can see what it looked like before and after.


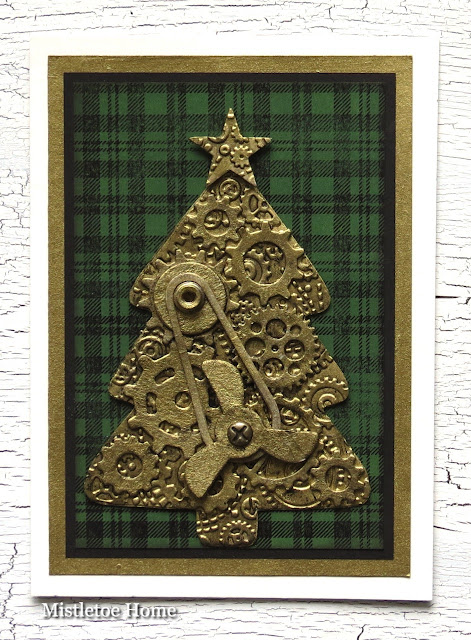
As for the background. I cut three rectangle panels. The first was painted with Candied Apple but since I found the colour too light, I blended Aged Mahogany ink onto the surface when the paint was dry.

The second was painted with Rustic Wilderness, that was perfect so I didn't add anything else.

Here is the card with this background.

The third one was painted with Prized Ribbon and since I found this too light too, I blended Faded Jeans ink onto the surface.

The next step was to stamp the coloured panels with the Plaid background stamp. For this, I used Jet Black Archival ink since I don't have the big version of the Black Soot Archival ink.

I cut around the stamped part, then inked the edges with Ground Espresso ink.

I placed and glued this stamped panel on a few millimetres larger black panel.
Here is the blue card:

What I used:
Stampers Anonymous, Plaid&Nordic stamp set (CMS243)
Sizzix Bigz L die, Industrial by Tim Holtz (661817)
Sizzix Bigz L die, Mechanical by Tim Holtz (665225)
Sizzix Bigz die, Gadget Gears 2 by Tim Holtz (661193)
Sizzix Bigz die, Crescent Moon&Stars by Tim Holtz (658716)
Sizzix Thinlits die, Gearhead by Tim Holtz (661184)
Sizzix Texture Fades, Blueprint&Gears set by Tim Holtz (658580)
Ranger Distress paint (Rustic Wilderness, Candied Apple, Prized Ribbon)
Ranger Distress inks (Aged Mahogany, Faded Jeans)
Ranger Archival inks (Jet Black, Black Soot, Ground Espresso)
Schmincke Acryl Bronze paint (Rich Gold)

No comments:
Post a Comment
Thank you for your lovely comments, I really appreciate it!