Showing posts with label decoupage. Show all posts

Tuesday, 28 November 2017

Round wooden box with Santa and children - decoupage technique

I'm preparing for the Christmas Fair which will be held in Esch-Sur-Alzette next Sunday (10 December). And I made this decoupage box to be one of my items there. I like the boxes because they are practical and they can be presents by themselves.


You know me, I'm not very talkative and this time I really have no time to say more :-)

Happy crafting!


Friday, 8 September 2017

Wooden box with horse

Let me show you my latest make, a girly box with a beautiful horse and sparkling stars. The horse was cut out from an IHR paper napkin and I adhered to the box with decoupage glue.


The stars were cut out with Sizzix Thinlits Die, Witchcraft by Tim Holtz (662386). Then I added glitters on the top of the stars.


Saturday, 10 December 2016

Aged decoupage box with Santa

Here is the box I have mentioned earlier. For this I chose an image from a Villeroy&Boch paper napkin which is one of my favourite image from this Luxembourgish-German company.


First I painted the poplar box to dark brown, then I added a layer of DecoArt Americana Decor Crackle Medium. When it was dry I put a layer of White Wash (DecoArt Americana) to the top and Mint Julep Green to the bottom.

I glued the image to the top with decoupage glue.


Then I stamped the little stars to the top and embossed them with Ranger Princess Gold embossing powder.


I sanded all the edges and smeared a little metallic gold to the edges of the bottom.


Then I added one layer of matte varnish.


With my box I would like to enter the following challenges:

A Vintage Journey: Winter Magic

Stamps&Stencils: Christmas Wishes


Wednesday, 7 December 2016

Aged decoupage boxes with roses

For the Christmas market two weeks ago I had made not just decoupage boxes in Christmas theme but for example these with flowers.


These - in the picture - were immediately sold, a mum bought it for her two daughters. But one of my friends also liked them, especially the one with darker green bottom (Arbor Green by DecoArt) so she was really disappointed when she learnt the boxes are gone.


So yesterday I have made her one :-)


And here are some other photos from the boxes of the market separately. 


Wednesday, 30 November 2016

Aged decoupage box with Santa and kids

Here I am again with another aged decoupage box for Christmas or for St. Nicolas (December 6th)!


To make this box I had to use masking sheet after gluing the main image and I had to paint the background by myself. I had to make the sky, the snowfall and the snow on the ground too.


The snow on the ground was created by snow pen and it became quite embossed. 


It's soon December and I will start again to show you my vintage Hungarian Christmas postcards. Each day I will bring you one as I did it last year!


Oh, and tomorrow there will be a new challenge at the Country View Challenges blog!

So see you soon!

Monday, 28 November 2016

Aged decoupage box with vintage toys

As I've already told you before I made many decoupage boxes recently. This one is with vintage toys and I crackled the top and the bottom as well. I used DecoArt Americana paints (White Wash, Mint Julep Green) but I smeared a tiny amount of Americana Multi Surface Vanilla Shake to the top.

For the crackling I used DecoArt Americana Decor Crackle Medium.


Sunday, 27 November 2016

Christmas decoupage box with Victorian Father Christmas

Lately I have made many decoupage boxes for a Xmas Market. Here is one of them. For this I used an IHR napkin,  the Victorian Father Christmas. I love this image very much, not just because it's beautiful but because I have a vintage postcard from 1909 with the same image.


Maybe with this picture you can see better the crackled bottom.


Monday, 18 January 2016

Decoupage box with birds in hat - green version

I was asked to make the red box with birds in hat in a more wintery version. This is why I put glitters on the top to create a snowy-frosty result.


My friend wanted a kind of mint colour for the bottom and I think the Marabu Jade colour with some white at the end just worked perfectly.


With these box I would like to enter the Monday Challenge of the Simon Says Stamp Blog: BEST FRIENDS.


Saturday, 9 January 2016

Decoupage box with little birds in hat

I was asked to make a gift box with these cute little birds, so I have made this painted decoupage box.


Tuesday, 5 January 2016

Three drawers wooden box with cars

I have two nephews and as usual, if you give something to one of them, it's better if you give to the other as well, otherwise...


Well, a few months ago I had made a three drawers box with owls for the 7 years old, but I couldn't finish the other box in time, so I couldn't ship the present for the 4 years old. Since then, every time we talked on Skype he asked me about his box. He kept nagging me with his questions: "Have you finished my box? " "When will you do my box?"


So now, I'm happily announce it that I'm ready with the box :-)


Tuesday, 29 December 2015

Decoupage box with vintage world map

Well, this decoupage box was made for the father from our friends' family. I painted the wooden box brown and glued a vintage world map paper napkin on the lid.


The brand of the napkin is Caspari.


Monday, 28 December 2015

Decoupage box with cupcakes

This is my third decoupage box which was made one of the girls from our friends' family. I put cupcakes on her box because she is the one who likes to make cakes.


Sunday, 27 December 2015

Decoupage box with butterflies

Here is my second decoupage box that I made as a Christmas present. But for this little girl I intended butterflies instead of dragonflies.


To the top: I used white acrylic paint, Rayher-DecoArt Patina paint to the edges and Caspari paper napkin.

To the bottom: I used Rayher-DecoArt chalky finish paint (Jade) and I rubbed some  white (mainly to the edges) with a sponge in the end.


Saturday, 26 December 2015

Decoupage box with dragonflies

Now - because I handed it to her new owner - I can show you my decoupage box with dragonflies.


For this box I used Caspari paper napkin. This brand is very good quality to decoupage. 


Wednesday, 23 December 2015

Decoupage box with cars and guitars

Oh, Christmas is here soon! But I'm here with a quick blogpost, with a decoupage gift box for boys.


Happy hustle and bustle for Christmas!


Tuesday, 15 December 2015

Christmas decoupage box with Santa

Here is my latest Christmas decoupage box with a motif from a Villeroy&Boch paper napkin.


Sunday, 6 December 2015

Wednesday, 25 February 2015

Pink shabby chic box with drawers

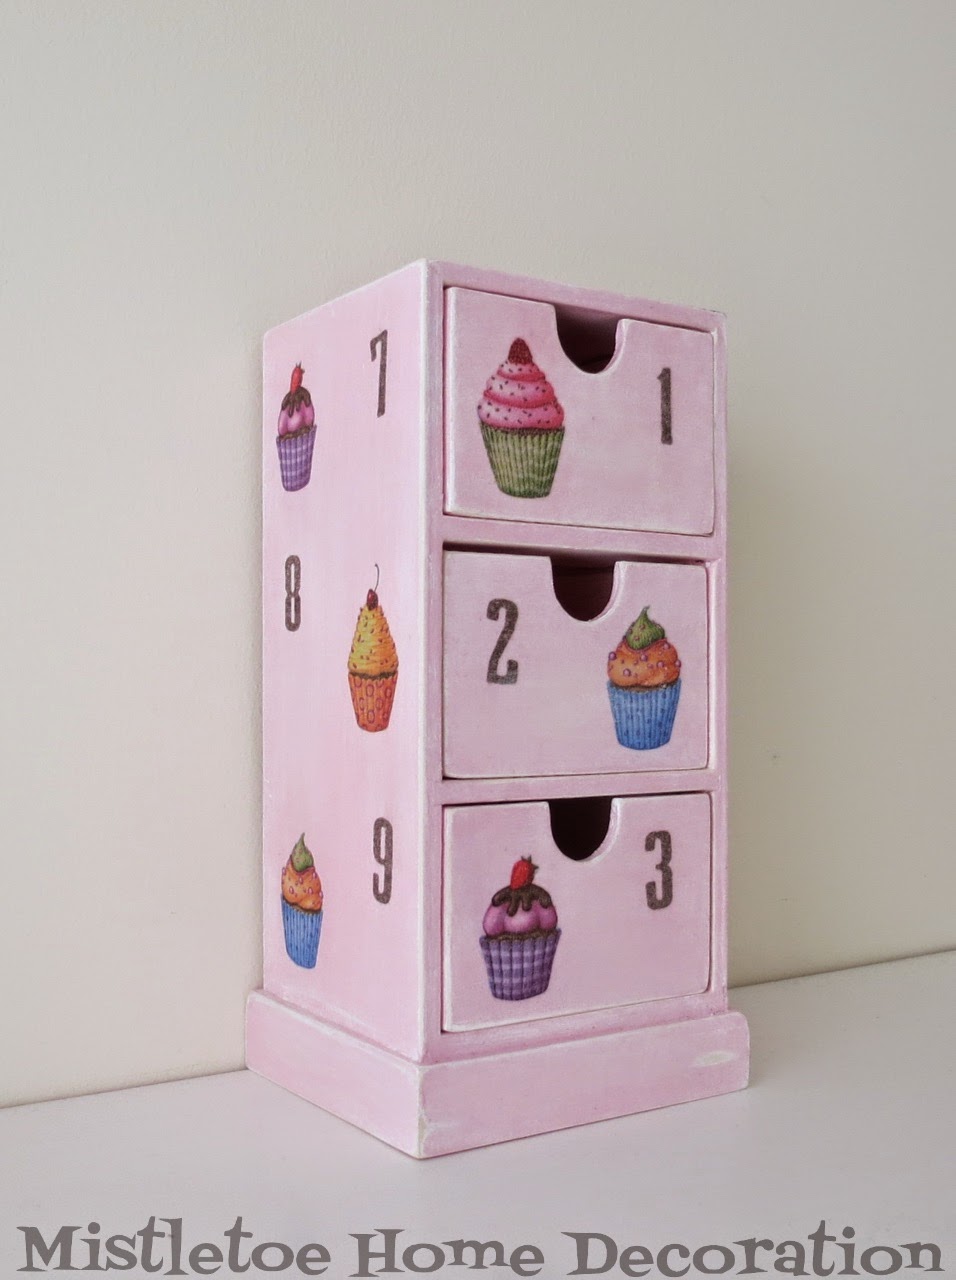
I made this box for Eszter... a storage for her tiny stuff.


The basic is a simple plain wooden storage box with 3 drawers that I bought very cheap at the German Tedi store. 


First I painted it white with acrylic paint.


Then I sanded with sandpaper because some parts of the box were very rough.


Here, you can see it before sanding:


And after sanding:


Then I put a thin layer of pink acrylic paint. I used the Marabu Wild Rose colour. 


Meanwhile I asked Eszter what pattern she preferred from my paper napkin collection and she chose the little cupcakes. I tried to persuade her of choosing the owls instead but I think she had enough of my owls :-)


I cut out the cake shapes with scissors and I glued them with decoupage glue on the wooden surface.


I made the number by myself with using a plain brown IKEA paper napkin and a Sizzix die (Wanted by Tim Holtz).


Then I sanded the edges and other parts to give a shabby look but just slightly because Eszter looked very nasty at me :-)


You can see the drawer number 1 before sanding, and the drawer number 3 after sanding:


In the end I put a neither too thick and nor too thin layer of Ranger Distress Paint (Clear Rock Candy).


You can see nice tiny crackles on the wood here:


and here:


I named the box:  NUMBERS OF CUPCAKE