Showing posts with label Christmas tree. Show all posts

Saturday, 14 December 2024

Vintage Hungarian Christmas cards #151

I can say that there is nothing special about this card but of course I can't say this because it's cute and vintage - almost a 100 years old. It was posted in 1927.


You can find my other vintage Christmas cards, just click on the label - old Christmas cards - on the sidebar.


Tuesday, 26 November 2024

Sepia colour Christmas card with pine tree

Hello again, if you have seen my black and white Christmas cards then you know that I chose the exact same design and stamp sets to create this new one where I chose a vintage sepia effect. 


To achieve this sepia look I stamped the pine tree on a Neenah Solar white paper with Tsukineko Memento Rich Cocoa ink. Then I coloured the bottom part with Copic Sketch E41, the top part with E42 marker. Then I went over with an E000 marker to make the colouring more even. 


Then I also blended Antique Linen ink to the top part. I inked the edges with Gathered Twigs ink. The next step was to spatter the card with white acrylic ink to create the snowing effect. With a tiny brush I added here and there bigger white dots.

In the end I stamped the text to the bottom part.


What I used:

Stampers Anonymous, Winter Woodlands by Tim Holtz (CMS476)

Stampers Anonymous, Yuletide by Tim Holtz (CMS356)

Tsukineko Memento ink (Rich Cocoa)

Ranger Distress ink (Antique Linen, Gathered Twigs)

Ranger Distress paint (Picket Fence)

Copic Sketch markers (E41, E41, E000)


With my card, I would like to join the Simon Says Stamp Monday Challenge: Trees

Friday, 22 November 2024

Black and white Christmas card with pine tree

Hello everyone, Today I would like to show you my Christmas cards, which were super easy to make. 


For these cards, I used the beautiful pine tree from the Stampers Anonymous Winter Woodlands by Tim Holtz. I stamped the tree about a 11x15,5 cm watercolour paper with Black Soot Archival ink.


Then I blended Lost Shadow Distress ink to the whole panel. For the daytime card, I blended Hickory Smoke ink to the top part, and Black Soot for the night card. Then I spritzed with white acrylic paint to make the cards snowy.

I added black soot ink to the edges of the daytime card.

Then I stamped the Christmas Greetings text from the Yuletide stamp set using Black Soot Archival ink again.


What I used:

Stampers Anonymous, Winter Woodlands by Tim Holtz (CMS476)

Stampers Anonymous, Yuletide by Tim Holtz (CMS356)

Ranger Distress Archival ink (Black Soot)

Ranger Distress ink (Black Soot, Hickory Smoke, Lost Shadow)

Ranger Distress paint (Picket Fence)


Friday, 22 December 2023

Gingerbread man Christmas tree ornament

Hello everyone, I'm here again with another Christmas tree ornament, a gingerbread man. For this, I used an old and retired die set, the Fresh Baked 2 (663116). 


And if you like it, here is the tutorial for you.


I cut the gingerbread man figure 8 times from a thicker cardboard. It was as thick as the paper of a roll of a paper towel. I glued them together one after the other. In the middle I also placed and glued a little cap that I cut out using another old and retired die, the Carved Ornaments 2 (657475).


Then I painted white both sides.


Then I painted gold with Emperor's Gold DecoArt Americana paint. Actually, I applied at least 3 layers.


Then I added a thin layer of Schmincke gold paint too, because it was less orangey.

Then I added flat back pearls for the eyes and the buttons. The rest of the decorations were cut out from glitter papers (black, red). The scarf is part of the Cool Yule die set (663099). Now this is one is not discontinued yet! 


And see how much fun Gingerbread man is having on the Christmas tree, under the little house. And yes, I also made the little house with another Tim Holtz's die, the Paper Village. And here is the tutorial for that one.


Saturday, 2 December 2023

Christmas card with the Sizzix Trim a Tree die set

Hello everyone, a few weeks ago I have made a card with the Sizzix Trim a Tree die set by Tim Holtz. You really liked, maybe because of the unusual colours, the white Christmas tree and the pink background. If you haven't seen it yet, you will find it here.

This time, I wanted a green Christmas tree.


The other card has a full tutorial, so here I just write down the things I did differently.

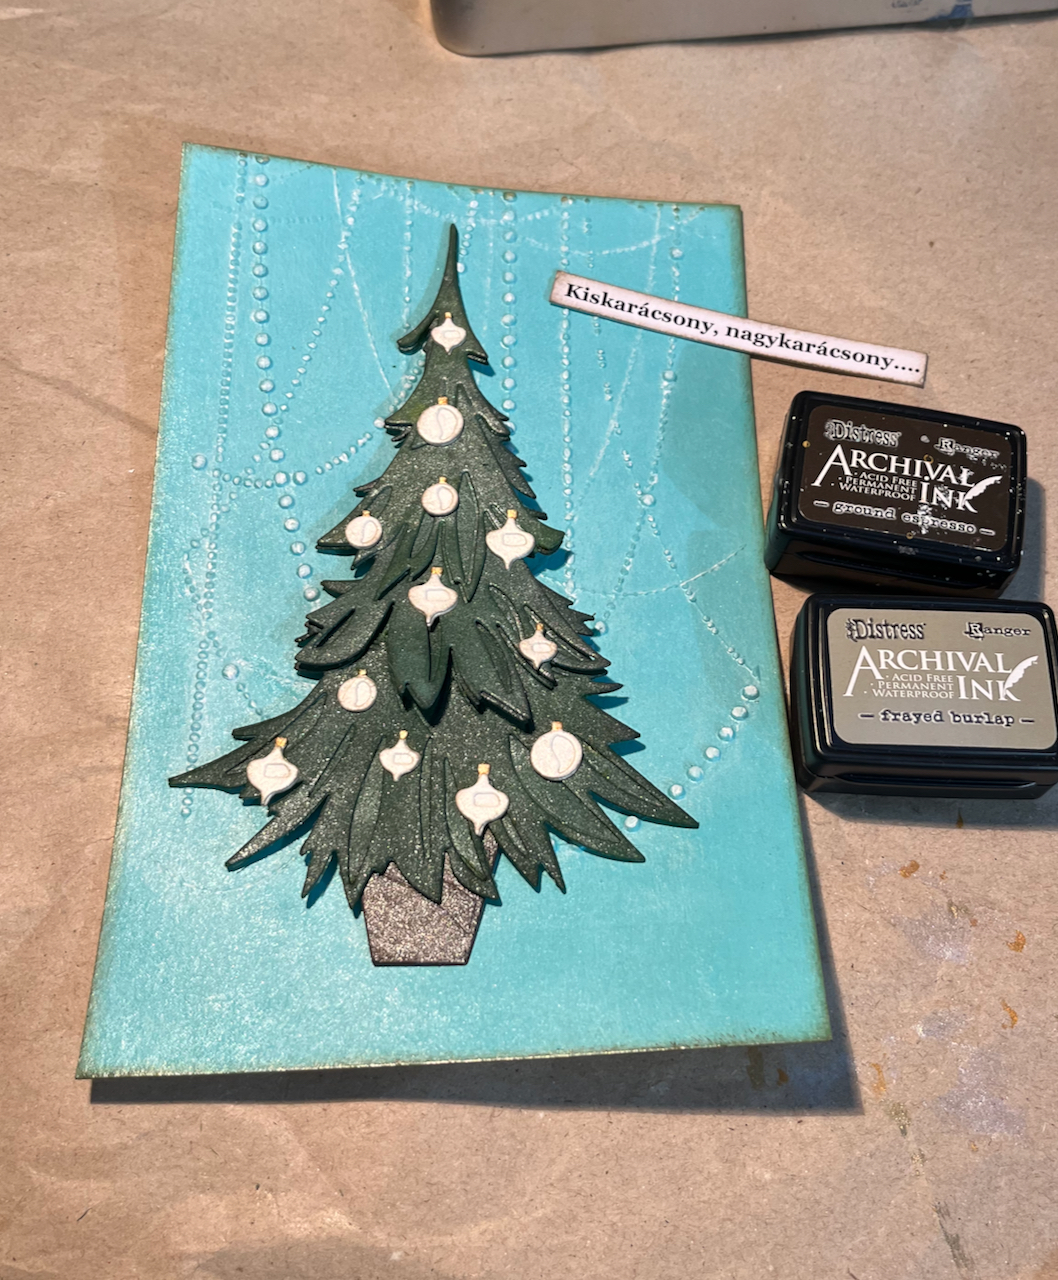
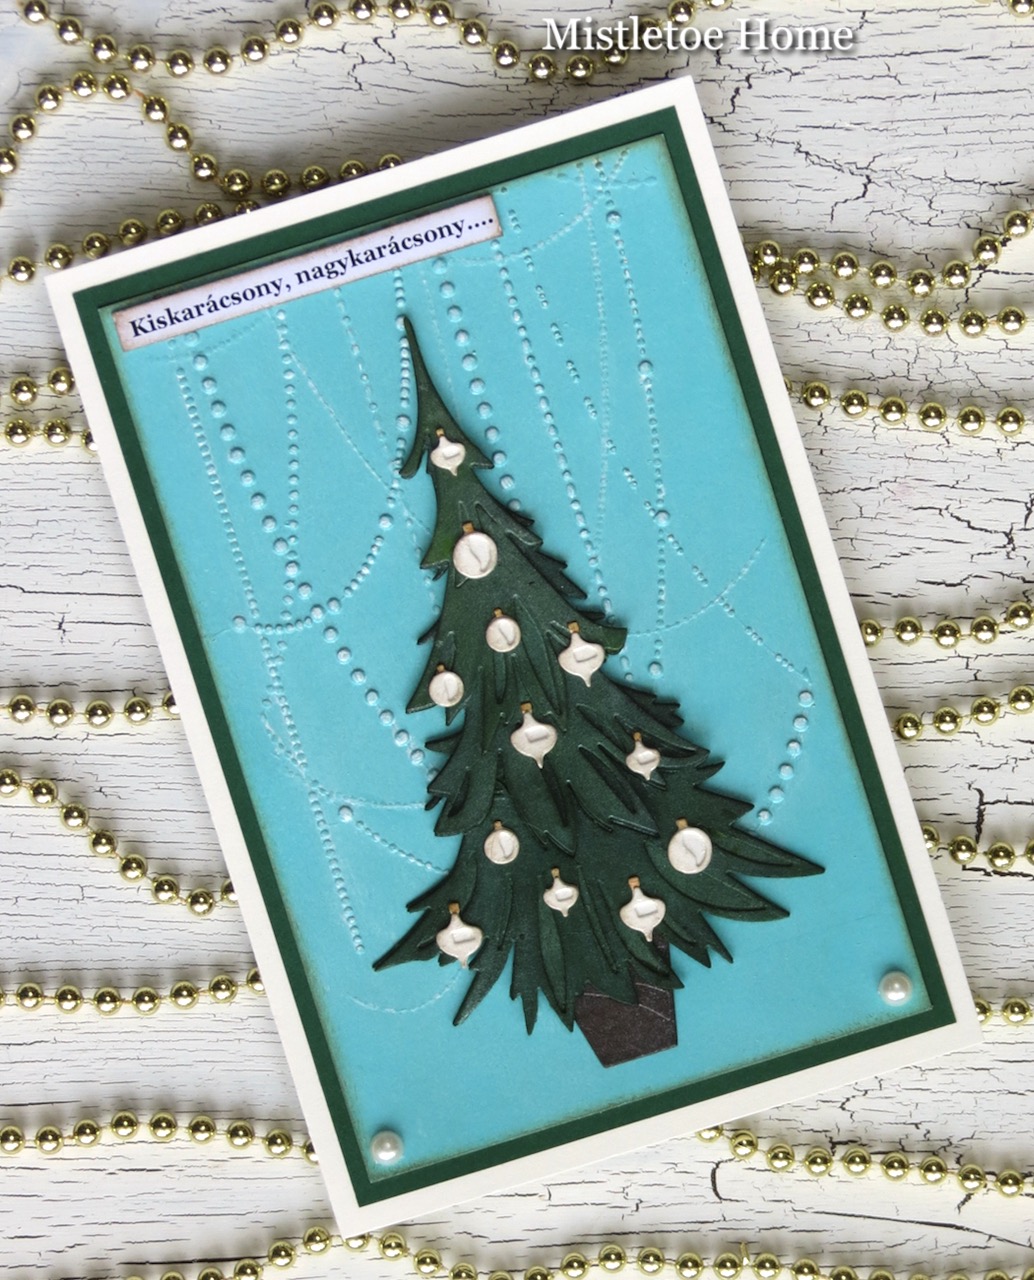
The background was painted with Distress Salvaged Patina paint.


The pine tree was first sprayed with Distress Mowed Lawn Oxide Spray. But then I changed my mind, and I wanted something deeper and darker. So with a sponge I blended Rustic Wilderness ink to the whole surface. I inked the edges with Ground Espresso, then I added a thin layer of pearl paint.


The pot was coloured with Walnut Stain and Ground Espresso ink.


The ornaments cut out from white paper and I inked the edges with Pumice Stone. Then I added a layer of pearl paint.


The edges of the background panel were inked with Frayed Burlap and Ground Espresso Archival ink.


The text is the first two words of a Hungarian Christmas song.


What I used:

Sizzix Thinlits dieTrim A Tree Colorize (666332)

Sizzix Texture Fades embossing folder, Sparkle (666298)

Ranger Distress Archival ink (Frayed Burlap, Ground Espresso)

Ranger Distress paint (Salvaged Patina)

Ranger Distress ink (Pumice Stone, Ground Espresso)

DecoArt Americana (White Pearl)

etc.


With my card, I would like to join the Simon Says Stamp Monday Challenge: Trees

Friday, 17 November 2023

Christmas card with Trim a Tree by Tim Holtz

Here is the card that I had already finished yesterday but I was able to take pictures of it today. For this card I used the Trim A Tree die and the Sparkle embossing folder.


Although I love the traditional Christmas colours, I wanted something different this time. This is why I chose the Picked Raspberry paint for the background. 

So first I took a panel and painted with the Picked Raspberry Distress paint. When it was dry, I embossed my panel with the Sparkle embossing folder. Then I added a thin layer of White Pearl paint from DecoArt Americana. Since I wanted to enhance the embossed pattern, I went over the panel with a brayer using white paint. When the white went to other parts than the embossed pattern I quickly wiped it off with a wet paper towel.

The pieces of the tree were cut out from white paper, then I inked the edges with Pumice Stone ink. Then painted all the pieces with the same White Pearl paint that I used for the background. The pot of the tree was inked with Pumice Stone, but I added Ground Espresso to the edges. Then I covered this with White Pearl too.


The ornaments were cut out from two different shades of green. I glued them together, then I added a tiny drop of gold to the top part. In the end, I covered them with White Pearl paint.

Here you can see the ornaments before adding the pearl paint and after.


I stamped the text directly to the background with Archival inks, first with Ground Espresso, then with Black Soot because the Ground Espresso was not enough.

I also placed a paper behind my card from the new 2023 Idea-Ology release.


What I used:

Sizzix Thinlits die, Trim A Tree Colorize (666332)

Sizzix Texture Fades embossing folder, Sparkle (666298)

Stampers Anonymous, Cozy Christmas (CMS444)

Idea-Ology Christmas Backdrops (TH94346)

Ranger Distress Archival ink (Black Soot, Ground Espresso)

Ranger Distress paint (Picked Raspberry)

Ranger Distress ink (Pumice Stone)

DecoArt Americana (White Pearl)

etc.


Tuesday, 22 November 2022

Golden Harvey with Speckled Egg background

I'm still playing with my gold and white Harveys and the colours that go with them. And I'm here with my fourth Harvey who got a Speckled Egg background this time. 


As you can see in this picture below, I tried a red background before the blue, but I didn't like them together. So I put the red background aside and I'm sure I will use it later for another project. Here I painted a piece of 300gsm watercolour paper blue with the Speckled Egg paint, then I inked the edges with Faded Jeans Archival ink. In the end, I embossed it with the old and retired Holiday Knit embossing folder. 

Basically, I kept the composition I chose for my pure gold and white card, but modified it slightly. I placed Harvey to the right side, I placed a Christmas tree next to him and I also put more gold stars.


The big stars are from the Twig&Stump, the tiny ones are from the Festive Things die set.

What I used:

Sizzix Thinlits die, Harvey Colorize (666066)

Sizzix Thinlits die, Festive Things (664191)

Sizzix Texture Fades, Holiday Knit embossing folder (661336)

Sizzix Thinlits die, Mini Christmas Things (662418)

Sizzix Thinlits die, Twig&Stump (666072)

Stampers Anonymous, Tiny Text Christmas (CMS424)

Ranger Distress paint (Speckled Egg)

Ranger Distress Archival ink (Faded Jeans)

Ranger embossing powder (Princess Gold)

Schmincke Arcryl Bronze, Rich Gold

Nuvo Ebony Black Crystal Drops


Don't worry, I will only come back once more with Harvey! I think it's time to say goodbye to him for a while and it's time to work with another dies and/or stamps.


Wednesday, 22 December 2021

Cards - Steampunk Christmas trees

You may know that I already had a blogpost with steampunk Christmas trees, but since all three greeting cards found a new owner, I decided to make three more. The only change is that the background colours are different to the previous three.

In that previous blogpost you will also find the step-by-step tutorial about how to make the trees and backgrounds. 

So here you can have the photos only.

First the green one, with Mowed Lawn Distress paint.


The next background was made with a Decoart paint, Purple Cow.


The last background, however, was not made with paint but with ink, Salvaged Patina Distress Oxide.


And here come the close-up photos.


I hope you like these too. Thank you for stopping by!


Monday, 6 December 2021

Card with steampunk Christmas tree

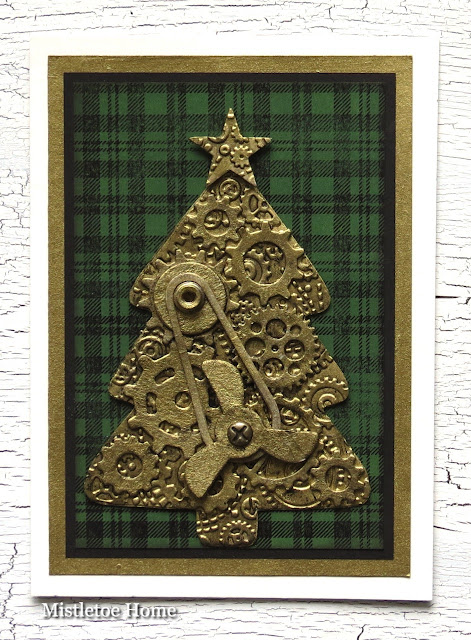
Hello everyone, today I would like to show you my card trio with steampunk Christmas tree. After one of my friends saw my steampunk canvas here on my blog, she asked me to make her a card with the same steampunk tree because she wants to surprise someone with it. 

I said yes, although the canvas with the steampunk tree took a lot of time to make. So I decided that if I'm going to do a big job again, I'd better make it three :-)

From the three Christmas cards, she chose the one with the red backgrounds.


In the steampunk canvas post you will find the tutorial for making a Christmas tree with gears. But there are some differences, so I will try to write them down.

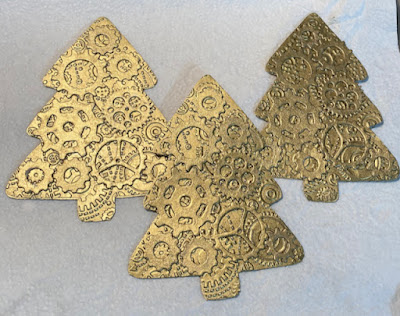
I scaled down the original Christmas tree and drew it on a 300 gsm paper. That was the base.


Then I traced the outline of the tree on a 200 gsm paper. This became the tree that I embossed.


I painted gold the 200 gsm paper and when it was completely dry, I embossed it.


Then I cut out different sizes of gears and tried to arrange them on the tree. I painted the gears gold and when I was satisfied with the design, I started to glue the cogs on the embossed tree.

If I remember correctly, I aged the Christmas tree on the canvas with brown paint but here, I did it with diluted black paint.


Here you can see what it looked like before and after.


As for the background. I cut three rectangle panels. The first was painted with Candied Apple but since I found the colour too light, I blended Aged Mahogany ink onto the surface when the paint was dry.


The second was painted with Rustic Wilderness, that was perfect so I didn't add anything else.


Here is the card with this background.


The third one was painted with Prized Ribbon and since I found this too light too, I blended Faded Jeans ink onto the surface. 


The next step was to stamp the coloured panels with the Plaid background stamp. For this, I used Jet Black Archival ink since I don't have the big version of the Black Soot Archival ink.


I cut around the stamped part, then inked the edges with Ground Espresso ink.


I placed and glued this stamped panel on a few millimetres larger black panel. 


Here is the blue card:


What I used:


Stampers Anonymous, Plaid&Nordic stamp set (CMS243)


Sizzix Bigz L die, Industrial by Tim Holtz (661817)


Sizzix Bigz L die, Mechanical by Tim Holtz (665225)


Sizzix Bigz die, Gadget Gears 2 by Tim Holtz (661193)


Sizzix Bigz die, Crescent Moon&Stars by Tim Holtz (658716)


Sizzix Thinlits die, Gearhead by Tim Holtz (661184)


Sizzix Texture Fades, Blueprint&Gears set by Tim Holtz (658580)


Ranger Distress paint (Rustic Wilderness, Candied Apple, Prized Ribbon)


Ranger Distress inks (Aged Mahogany, Faded Jeans)


Ranger Archival inks (Jet Black, Black Soot, Ground Espresso)


Schmincke Acryl Bronze paint (Rich Gold)