Showing posts with label snow. Show all posts

Tuesday, 28 November 2023

Tags with snowman of the Winterscape stamp set

Hello everyone, I'm here with three tags that I made for three girls. Every year I join a giveaway campaign to make Christmas packages for Hungarian children living in poor financial circumstances. So I needed three tags quickly because I have to deliver the packages on 30 November.


For making these tags, I took a Neenah Solar White sheet and cut out three tags with one of the dies of the Sizzix Framelits, Tags Collection set. Then I stamped the snowman on the tags with Espresso Truffle ink. Then I masked the snowman and stamped the tree. For the text I used Tuxedo Black ink and the Christmas Cartoons stamp set.


Then I coloured the tags with Copic Sketch markers. Even the sky. I inked the edges with Broken China, then I added white dots using acrylic paint.


What used:

Sizzix Framelits die, Tag Collection (658784)

Stampers Anonymous, Winterscape (CMS428)

Stampers Anonymous, Christmas Cartoons (CMS473)

Copic Sketch markers


With my tags, I would like to join the Simon Says Stamp Monday Challenge: Trees


Wednesday, 14 December 2022

Bottle tags with snowman

For the holidays, or other celebrations, like birthday, I not only make cards but bottle tags as well. I haven't created one for Christmas this year, so I making it up now. Here are Twig1 and Twig2, the two drinking buddies on two tags :-)


I cut out two tags and coloured the upper part with Tumbled Glass and with Picket Fence paint the lower part. Using Ranger Opaque Matte Texture paste and a snow stencil, I created a snowy background. 


The text was stamped with Ranger Distress Archival ink (Black Soot). The bottle is part of a Halloween die set and the trees are from the Home for the Holidays die set.


What I used:

Sizzix Thinlits die, Twig&Stump (666072)

Sizzix Thinlits die, Home for the Holidays (662419)

Sizzix Thinlits die, Regions Beyond (664207)

Stampers Anonymous, Tattered Christmas (CMS318)

MFT Stamps, Wine Tag Die-Namics


And look, how good they look on a Moët&Chandon champagne bottle. 


With my tags, I would like to join the Simon Says Stamp Monday Challenge: Tag it


Monday, 12 December 2022

Christmas cards with Mr. Frost by Tim Holtz

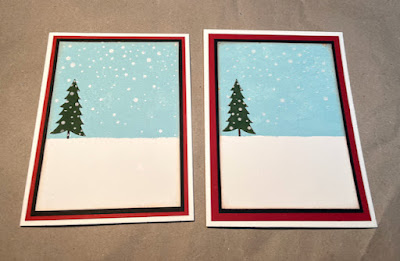
Poor Mr. Frost has been waiting silently for his turn in the cellophane bag to finally get a nice Christmas card. I'm sorry I've neglected him for so long, but he is adorable. So I decided to make two cards at once. Here they are.


I made the background of both cards the same way. I little bit more than half part was painted blue with Tumbled Glass Distress paint, the bottom part with Picket Fence. When it was dry I added Ranger Opaque Matte Texture Paste through a snow stencil.  

I cut out the pine tree with the Home For The Holidays tree die and painted green with Rustic Wilderness paint. When it was dry I also added snow using the same texture paste and stencil.


I adhered the background to a little bit bigger black panel, then to a red panel. Here in the picture you can see, that one of the card has bigger red border. 

Mr. Frost was cut out from white watercolour paper and I inked the edges with Tumbled Glass and Antique Linen Distress inks. 


I cut out the scarf and the green strip of the hat from felt. You can find the same texts in the Holiday Sketchbook stamp set. I stamped on a black paper with embossing ink and heat embossed using white fine embossing powder. With white paint I added some snow dots on the snowman. 


The text strips and the layer panels were cut with Tim's guillotine.


Thursday, 24 November 2022

Twig and Stump meets Santa Claus

Now, after many posts with Harvey, here I am with Twig and Stump the two adorable snowmen from the latest Sizzix release by Tim Holtz. 


I imagined a scene, a night before Christmas, when Twig and Stump notice Santa and his reindeers in the sky. And they start waving to them, and Santa wishes them a Merry Christmas. To create this scene, I used the last year Diecember die by Sizzix Tim Holtz, the Dash Away All. This had the perfect size for my card.

For the background I used blue inks and spray stains. I just added layers after layers. First I started with lighter colours and I added darker like Chipped Sapphire close to the edges. I also added Black Soot to the edges. In the end I sealed the whole sky part with diluted Uncharted Mariner paint.


The tree was inked with Crushed Olive and Rustic Wilderness. I inked with Speckled Egg the edges of the snowmen. I put white paint to the edges of the pine tree. I started to glue on the die-cuts on the card, then I splattered with white paint.


And one more thing. I stamped one of the sentiments from the Doodle Greetings 2 stamp set on the inside of the card. 


What I used:

Sizzix Thinlits die, Twig&Stump (666072)

Sizzix Thinlits die, Dash Away All - Diecember 2021 (665468)

Stampers Anonymous, Tiny Text Christmas (CMS424)

Stampers Anonymous, Doodle Greetings 2 (CMS286)

Ranger Distress inks, paints


I hope you like it! Happy crafting!


Wednesday, 5 October 2022

Christmas card with Carousel by MFT Stamps

I would like to share with you today my Christmas card that I made with the MFT Stamps Carousel die and Carousel Horses stamp set. When I was making this card, I was thinking of those Christmas/Advent markets, where, next to the vendors' stalls there was always a carousel where the children including my daughter always loved to sit on.


The stamped images were coloured with Copic Sketch markers, but the background and the rods were coloured with acrylic paints (blue, white, gold). The text was heat embossed with fine white embossing powder.


What I used:

MFT Stamps, Carousel Horses Stamp Die-Namics

MFT Stamp, Carousel Horses stamps

MFT Stamps, Carousel Die-Namics

Copic Sketch markers

DecoArt Americana paints

Ranger Super Fine White embossing powder

etc.


Thursday, 10 December 2020

Tag with Christmastime by Tim Holtz

Hello dear crafters, I'm here with a Christmas tag. In October I've already made a night scene with this lovely couple and I really liked that card. So I decided to make another night scene with them but on a tag. Here is what I created.


If you want to know how I assembled the couple, please click here. It's the post of my card with the same couple and I explain everything there.


What I used:

Sizzix Thinlits die, Christmastime by Tim Holtz

Sizzix Thinlits die, Tree Line by Tim Holtz

Sizzix Movers&Shapers, Tag&Bookplates by Tim Holtz

Stampers Anonymous, Holiday Drawing by Tim Holtz

Ranger Distress paint (Chipped Sapphire, Picket Fence)

Ranger Distress Grit-Paste

Ranger Distress Archival inks (Black Soot, Hickory Smoke, Ground Espresso)

Ranger super fine white embossing powder 

Idea-Ology, Tiny Bells

Idea-Ology, Tinsel Twine (Silver)

etc.


With my tag I would like to join the:

Simon Says Stamp Monday Challenge: Favorite Technique

Simon Says Stamp Wednesday Challenge: Let It Snow


Thank you for stopping by!!! Happy crafting!!!


Monday, 30 November 2020

Box card - winter scene with boys

Hello everyone, I'm here with a new box card which was made with the MFT latest release die, the Outside the Box, Level-Up die set. These boys on the card are my cheeky nephews and I made this card for my sister.


What I used:

MFT Die-Namics, Outside The Box, Level-Up die set

MFT Die-Namics, Outside The Box, Snow Drifts die set

MFT Birdie Brown, Pile On The Hugs stamp set

MFT Birdie Brown, Snow Buddies stamp set

MFT Birdie Brown, New Best Friend stamp set

MFT, Cool Christmas stamp set

Copic Sketch markers

Neenah Solar White papers

etc.


With this card, I would like to join the:

MFT Outside The Box Challenge: Happy Holidays

Simon Says Stamp Wednesday Challenge: Anything Goes


Tuesday, 6 October 2020

Christmas card - Christmastime by Tim Holtz

Hello everyone, I'm here with a new card and with a step by step tutorial. This card was made with one of the Sizzix Chapter 3 dies by Tim Holtz, it's called Christmastime. I hope you like the scene I created.


Now let's start from the beginning. First of all, with the couple. 

Here I will explain you how I assemble the male character, because I did the same with the female.

I cut out the male two times to make it thicker. The brown is a great underlayer. I glued them together.


Then I inked the edges with Gathered Twigs Distress ink and coloured the face with Beige and Flesh Colour Zig Clean markers.


I used the same green cardstock for the hat and the same brown for the hair and the boots.


The scarf became blue, and of course I inked the edges with Gathered Twigs. And as I said, I did the same with the lady. So my happy couple is ready.


Now the background. 


I took an about 250 gsm paper and stencilled it with the Stampers Anonymous Bricked stencil. For this I used the Ranger Opaque Matte Texture Paste. I used the whole stencil. When it was dry, I cut them in two and painted with Hickory Smoke Distress paint.


I cut a rectangle panel with my Tim Holtz Trimmer from a 300 gsm paper. I painted dark blue the two-thirds with Chipped Sapphire Distress paint.


When it was dry, I inked the edges of the bottom with Gathered Twigs and Hickory Smoke Distress inks.


And the edges of the upper part with Black Soot Archival ink.


I inked the edges of the wall panels with Ground Espresso and Black Soot Archival inks.


I adhered my brick panels to the big rectangle panel and then I cut off the excess.


I used one of the Christmas ephemera pieces to make a house number. I made holes into the ephemera piece and fix it to the panel with mini fasteners.


Then I spattered my card with white acrylic paint. For this I covered my characters with cut-outs because I didn't want too much snow on them.


Then I spattered the characters too. When the snow was dry I  adhered my main panel onto a black panel with double-sided adhesive tape. And in the end, I sticked them onto a grey card. And my card was ready. This time there is no sentiment, I think it's obvious that this is a Christmas card.


Thank you for stopping by!!! Happy crafting!!!


Sunday, 22 December 2019

Christmas card - town scene in a bell jar

The thing is that I have projects to show but I have no time to blog about them. Right now I have found some time to write a short tutorial of this card.


The basic if this card is a black folded card because the black looks great with the red. 

The second layer is red cardstock and I stamped one of the background stamps from the Stripes&Holiday stamp set (Stampers Anonymous/Tim Holtz). For this, I used the Ranger Archival Jet Black ink.

I inked the edges with Walnut Stain Distress ink.

For the Christmas town scene, first of all, I used the Sizzix Bigz, Bell Jar die. The top was cut out from 300gsm watercolour paper. The bottom from kraft paper. The bottom was inked with Vintage Photo Distress ink.

The upper part of the top was inked with Stormy Sky Distress ink. Then I cut out the elements of my scene from Core'dinations Kraft Core papers. 

For the scene, I used: Sizzix Thinlits Snowglobe, Tiny Snowglobes and Festive Things dies.

For the big stars, I used the Sizzix Bigz, Crescent Moon die.

For the little stars, I used the Sizzix Thinlits, Snowglobe die.

All the stars were cut out from Metallic Kraft paper by Tim Holtz.


I hope you like it!!! Thank you for stopping by!!!

With my card, I would like to join the following challenges:

Simon Says Stamp  Monday Challenge: Cityscape 

A Vintage Journey: Holly Jolly Christmas


Tuesday, 3 December 2019

Christmas card with Mr Snowman

Hello Everyone, I'm here again with a Christmas card! But this time I used Mr Snowman and the Apline die sets by Tim Holtz.


The background was painted with the mixture of the following Distress paints: Broken China, Picket Fence and Bundled Sage. When it was dry, I stamped and heat embossed snowflakes from these stamp sets: Winter Sketchbook (CMS094) and Holiday Drawing (CMS284). The three snowflakes from the latter set were cut apart by me. 

To the bottom part, I added Distress Grit Paste.


The edges of the cart were inked with Vintage Photo Archival ink.

All the cut-outs were hand-painted. For the snowman's scarf, gloves and the text, I used Festive Berries.


I hope you like it!!! Thank you for stopping by!!!


Monday, 18 November 2019

Winter card with girls and snowman

Let me show you my latest make, a winter card with little girls, a snowman and a doggy. These images are part of the MFT Birdie Brown, Snow Buddies stamp set.


I also used the MFT Pure Innocence, Sending Blessings stamp set for stamping the trees and the Bitty Holiday Wishes for the text.

I coloured the images with Copic Sketch markers.


I hope you like it!!! Thank you for stopping by!!!


Sunday, 18 November 2018

Christmas card with penguins by Stacey Yacula

Let me show you my latest card, a Christmas card with the Sweet Holiday Penguins by MFT. They are so cute and so beautifully drawn.


I stamped the images with Ranger Archival ink (Jet Black) and coloured them with Ranger Distress markers using watercolour technique. For the snowflakes, I used white acrylic paint and a fine detail paint brush.


I hope you like it!!! Thank you for stopping by!!!

Sunday, 18 February 2018

Viking's winter wishes

Today this is my second post because the Creative Olympics ends very soon over at MFT Challenge blog. And I wanted to give myself a last chance to enter again. And how lucky I am, with this card I can join two different challenges, the Stamping Slalom because I used three stamp sets and the Freestyle because I made a winter scene.


What I used:

MFT, BB Viking stamp

MFT, PI Warm Wishes stamp

MFT, Oh Christmas Trees stamp

MFT, Snowfall stencil

Die-Namics, Snowdrift die

Die-Namics, Sentiment Strips die

DecoArt Americana paints (Blue Chiffon) - for the background

Ranger, Glossy Accents  - for the snowdrift

Ranger Distress Stickles, Clear Rock Candy - for the snowdrift

Ranger Texture Paste, Opaque Matte - for the snowfall

Copic Sketch markers - for the Viking

Tsukineko StazOn Forest Green - for the pine tree

vellum - in front of the text

silver brads - for the text strip

Ranger Archival ink, Cornflower Blue - for the text

Crafter's Companion, Neenah Solar White paper - for the Viking

Tsukineko Memento ink, Tuxedo Black - for the Viking

Stick it! 3D foam adhesive tape


Can you see how sparkly is my snow? The Clear Rock Candy stickles make it.


And here is the logo of the Creative Olympics - I really enjoyed it!


MentésMentés