Showing posts with label tutorial. Show all posts

Sunday, 14 June 2020

Bookmark - rabbit with parachute

For making this bookmark I had two inspirations. One of them was my earlier bookmark with the same rabbit and the second was the current MFT sketch challenge, the Sketch 493.


I used two MFT stamp sets illustrated by Stacey Yacula for creating this bookmark. The Sky High and the Scene Builder. The latter stamp set is one of my favourites and I think it will soon become the most frequently used stamp set by me. 

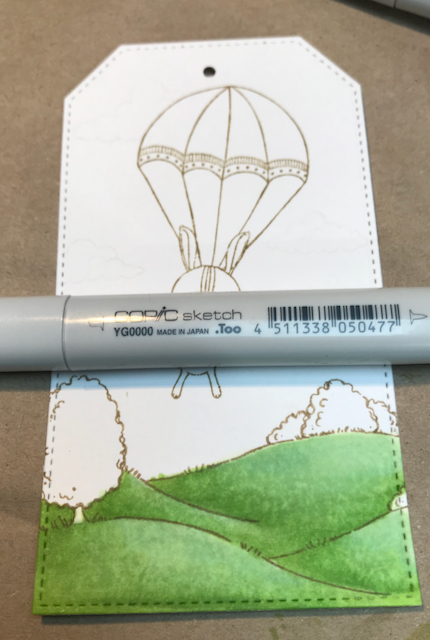
And here I share with you a tutorial of making the field because I will need this later.

So, I started with YG0000:

  
Next with YG25


Next YG23


Next G21


Next YG11


Then I repeated again with YG0000


And then YG21


For the tree, I used YG67, YG63, YG61.


I hope this tutorial will be useful for you too!

And here is an another photo of the finished bookmark.


Friday, 20 September 2019

Red poppies with dark blue background

After my gold embossed poppy card, I wanted to make a more traditional one where the poppies are coloured to red. I wanted to create a background which enhances the beauty of the poppies and I also wanted to make it elegant. So I created this:


And here is my tutorial:

I stamped the image onto a Neenah Solar White paper (110lb) with Versamark ink, then I heat embossed with Ranger Princess Gold embossing powder. I so loved this stamp, so I decided to keep the whole image, I just didn't want to cut off any part of it. This is why I didn't use any MFT STAX die, I just trimmed off the white areas with a guillotine.

Then I started to colour the images with Copic Sketch markers. 


If you can't see in my picture what colours I used, I will tell you then. 
For the poppy flowers: R27, R24, R22, R11
For the middle of the poppy flowers: C6, E11, W3
For the stems: YG03, G24
For the fruit: E11, W3
For the background: B29, B26


Actually, the background wasn't that dark (the photo doesn't do it justice), so for more drama, I coloured some areas with Dark Indigo and Black Faber-Castell Polychromos pencils.

I also used my colourless Copic marker to remove the unwanted colours from the embossed contours.


After I sprayed my colouring with a fixative and I placed my card onto a red, then a gold panel. In the end, I glued it on a dark blue card base.

Oh, the sentiment! I stamped the text with Versamark onto a paper strip from the same cardstock I used for the card base. I heat embossed with Princess Gold, then cut out with one piece of the Essential Fishtail Sentiment Strips die set.


What I used:

MFT Poppies background stamp

MFT Essential Sentiments stamp set


Copic Sketch markers

Ranger Princess Gold embossing powder

Tsukineko, Versamark ink

Faber-Castell Polychromos pencils

Tombow Mono Permanent Adhesive

Foam adhesive tape

gold, red, blue cardstock


I have made this card for the MFT 2019 Card Design Superstar challenge. And with this card, I would like to join the Coloring Virtuoso category. 

I hope you like it!!! Happy crafting!!!


Wednesday, 18 September 2019

Interactive Christmas card - Santa's in the chimney

For my interactive card, I got the idea from Torico who made a wonderful and playful card where Santa could go up and down in the chimney. So I decided to make a card with Santa who can also jump up and down in the chimney but I made some changes and I used a different technique and a different stamp set, actually a Birdie Brown's (Torico) stamp set :-)

Voilà, my card:


The background was a mixture of different shades of blues using Distress inks and Distress Oxide inks (Broken China, Chipped Saphire, Faded Jeans, Stormy Sky). Oh, I applied a little Black Soot as well. 

The snow was made with the Snowfall Stencil by MFT using Ranger Opaque Matte Texture Paste. 

The chimney was made with the Small Brick Wall stencil using the following Distress inks (Brushed Corduroy, Fired Brick).

The reindeers and Santa were stamped with Chocolate Hybrid ink and coloured with Copic Sketch markers.

And here you can see in pictures how Santa is coming up.


What I used:

MFT Birdie Brown, Jingle All The Way stamp set

MFT, Die-Namics A2 Rectangle Stax die - for the card, the roof and the chimney

MFT, Die-Namics Negative Dot Alphabet die

MFT, Die-Namics Surf&Turf die

MFT, Die-Namics Interactive Pull Tabs die

MFT Small Brick Wall stencil

MFT Snowfall stencil

MFT Pin&Slide disks

Ranger Distress inks

Ranger Distress Oxide inks

Copic Sketch markers

Ranger Opaque Matte Texture Paste


And in the end, here is my video:


With my card, I would like to join the MFT 2019 Card Design Superstar Challenge in the Innovation Master category.

I hope you like it!!! Happy crafting!!!


Friday, 13 September 2019

Card with porthole and fish

I'm here with the second project for the September challenge of the Country View Challenges. The theme is Under the sea and the lovely Rachel is your hostess this month.

I created a submarine whose porthole you can peep through to see the fish.


I cut out a rectangle panel with a Sizzix Framelits die and made a round porthole using two different sizes Sizzix circle dies. The main panel and the window were painted dark grey with DecoArt chalky finish acrylic paint. 

Oh, the little circles were cut out with Gear 2 Bigz die, using a middle of one of the cogs.


Then I randomly tapped DecoArt Media Transparent Red Iron Oxide onto the surface with a sponge.


I cut out a circle from watercolour paper and stamped Tim's fish from the Sea Life stamp set with Ranger Potting Soil Archival ink on it.


I coloured them with Ranger Distress markers, then I added a layer of Resist Spray for protection. For applying the Resist Spray I always spritz to a plastic sheet from the Resist Spray bottle and after I add this medium with a piece of sponge and tapping movements.


The text is from the Crazy Talk stamp set and was heat embossed on a black strip of paper with Liquid Platinum embossing powder.


What I used:

Stampers Anonymous, Sea Life by Tim Holtz

Stampers Anonymous, Crazy Talk by Tim Holtz

Sizzix Framelits die, Rectangles (658610)

Sizzix Framelits die, Circles (657551)

Sizzix Bigz die, Gears 2 by Tim Holtz (661193)

Ranger Distress markers

Ranger Distress Resist Spray

Ranger, Liquid Platinum embossing powder


If you have a project with an underwater theme, please don't hesitate to join our September challenge where you can win a £20 voucher!

With my card, I would like to join the Simon Says Stamp Monday Challenge: Stamp it


Sunday, 1 September 2019

Love card with blue and yellow seahorses

Hello everyone, I have just returned from my nearly 3 weeks holiday from Nice (France) so I can show you my new project that I created for the Country View Challenges.

In June I made a love card with seahorses that my friend liked very much so she asked it for her hubby. And since our September challenge is Under the sea, I decided to make another one, a little different version.


This is a little smaller and a little different than my earlier card. And now, it's time for a tutorial.

I took a white paper and I inked the top with Cracked Pistachio and the bottom with Broken China. Then I inked the whole surface with Antique Linen. After this, I decided to give it a pearl shine so I covered it with diluted White Pearl acrylic paint.


After I embossed it with an old Sizzix embossing folder, the Swirls from the Burlap&Swirls Texture Fades set by Tim Holtz. But silly me, I put my cardstock with the wrong side into the embossing folder but actually I like it. 


After I inked the edges with Ranger Archival ink, Coffee.

The next layer was a silver paper from Tim Holtz Metallic Paper Stash 8x8 that was inked with the same Archival ink.

I used the same metallic paper to cut out a strip and to make the text. For this, I used the Sentiment Words Thinlits dies.

The seahorses (Sand&Sea Bigz die) were painted with DecoArt Americana paints (Toffee Cream-Melon, Spa Blu-Primary Blue). The edges were inked with Coffee ink. Then I took my new favourite, the Resist spray and I covered the surface of the seahorses with this magic product. It gives everything a restrained shine and protection.

The flower was from the Tropical Thinlits die set and was coloured with Abandoned Coral and Squeezed Lemonade Distress markers, then covered with Resist spray.

Not to forget to tell you, I don't spray directly to the cutouts. I spray an amount of Resist liquid to a plastic sheet or tray, then I apply it with a sponge.

The seashell (Seashells Bigz die) was painted with Light Buttermilk paint. 


What I used:

Sizzix Bigz die, Sand&Sea by Tim Holtz (659576)

Sizzix Bigz die and Texture Fades, Seashells by Tim Holtz (662706)

Sizzix Thinlits die, Tropical by Tim Holtz (661207)


Sizzix Texture Fades, Burlap&Swirls by Tim Holtz

Idea-Ology Kraft Stock, Metallic Paper Stash 8x8 by Tim Holtz

Idea-ology, Long Fasteners by Tim Holtz

DecoArt Americana paints

Ranger Distress ink pads (Cracked Pistachio, Antique Linen, Broken China)

Ranger Archival ink (Coffee)

Ranger Distress markers (Squeezed Lemonade, Abandoned Coral)


I hope you like it!

If you have a project with an Under the sea theme, please don't hesitate to join our September challenge where you can win a £20 voucher!

With my card, I would like to join the:

Simon Says Stamp Monday Challenge: "S" is for - seahorses and seashell

Simon Says Stamp Wednesday Challenge: Anything goes


Thursday, 1 August 2019

Mixed media journal cover

Hello everyone, here is my first project for our August challenge, called Texture and the lovely Miriam will be your hostess.

So I made a mixed media journal cover. A long long time ago I bought a very cheap notebook in the IKEA and lately I decided to use it for journaling. So this will be mine :-)

I like nice but practical objects, this is why I wanted this cover to stay 2 dimensional, I didn't want any protruding or standing out 3D elements. I wanted a flat, 2D surface only.


My IKEA notebook looked very silly with a green weird face on the top. I sanded the surface first then I tried to place the cutouts on the top.


For the cutouts, I used the following Sizzix, Thinlits die sets: Script, Friendship Words, Script, Holiday Words 2, Mini Detailed Butterflies.


Then I wrinkled and adhered a tissue paper to the surface with decoupage glue. When it was dry, I covered the surface with white gesso.


After drying, I coloured the cover with the following DecoArt Americana paints: White Wash, Sweet Mint, Spa Blue.


I heat embossed the cutouts with Ranger Liquid Platinum embossing powder.

I smeared diluted Toffee and Mississippi Mud to the surface, then I spattered the cover with diluted Burnt Umber colour.


I inked the edges with Ranger Archival ink (Potting Soil).


I glued the cutouts onto the front and the back, then I stamped and heat embossed some circles to the empty places. For this, I used again the Liquid Platinum embossing powder.

Here you can see the back:


And a close-up of the front:


Unfortunately, the photos don't do justice. Because of the metallics, it was very hard to take photos. The colour, for example, more turquoise in real life.

With my journal, I would like to join the challenge of the Funkie Junkie Boutique Blog: Marvellous Metallics

I hope you like it! And if you have a project with some interesting texture, please don't hesitate to join our August challenge where you can win a £20 voucher!


Friday, 14 June 2019

Love card with seahorses

Hello everyone, let me show you my love card which can be perfect for a wedding as a congratulations card or for an anniversary. The summer is the period of weddings and wedding anniversaries, for us as well, so maybe I will give it to my hubby. 


For the background, I took a 300gsm watercolour paper and inked with Distress inks (Faded Jeans, Broken China, Tumbled Glass, Cracked Pistachio) then I made the whole surface vintage with watered Antique Linen ink. After I spattered with diluted white acrylic paint. The edges were inked with Antique Linen and Gathered Twigs ink.

The seahorses were cut out from chipboard and painted with DecoArt Americana paints. The blue with Primary Blue, White Wash and Indian Turquoise, the pink one with Melon, White Wash and Bright Orange. The edges were inked with Ranger Archival ink (Potting Soil).


What I used:

Sizzix Bigz XL die, Deco by Tim Holtz

Sizzix Bigz die, Sand&Sea by Tim Holtz

Sizzix Bigz die, Seashells by Tim Holtz

Sizzix Thinlits die, Garden Greens by Tim Holtz

Sizzix Thinlits die, Mini Holiday Greens by Tim Holtz

Idea-Ology, Hex Fasteners

Idea-Ology, Baubles

Ranger Distress ink pads

DecoArt Americana paints

gold glitter paper


With my card, I would like to join the:

Simon Says Stamp Wednesday Challenge: Wedding/Anniversary


I hope you like it!!! Thank you for stopping by!!!